Even the most professionally shot footage often has shaky scenes. In Premiere Pro, Stabilization is used for fixing shaky videos. It’s easy to stabilize in Premiere Pro using Warp Stabilizer Effect. Follow these steps to apply the stabilization effect.
Steps to Stabilize Video in Premiere Pro
Begin by importing your recorded footage into the timeline in Premiere Pro.
Step 1:
Import your video into Premier pro by hitting [Ctrl + I] for windows and [Cmd + I ] for Mac. Or you can go with File > Import.

If you already have an existing video in your project panel, then drag the clip onto the timeline.
Step 2:
Now Select the clip that you want to edit on the timeline. Then go to Effects Panel and search in the search bar of the effects panel Warp Stabilizer.
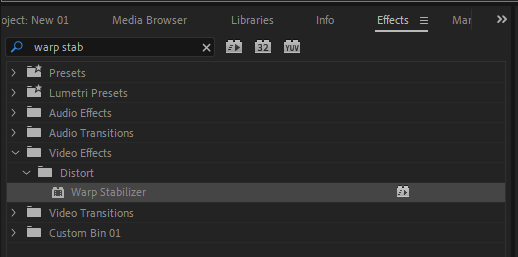
Drag this effect into your video. Or just double-click the warp stabilizer effect. That should apply to your clip.

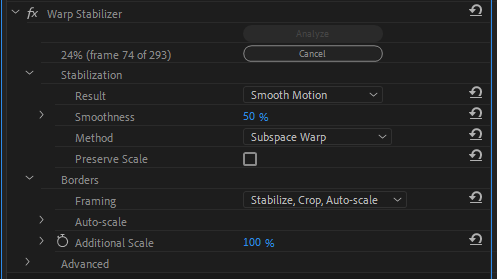
You should see a blue Analyzing in background text message across the video footage. It will take some time to complete the process. The time duration depends on the video footage length and complexity of the clip. You can keep editing while the process runs in the background.
Step 3:
On Effect Controls you should find the warp stabilizer settings. Adjust the smoothness, by default it will show 50%. Increase the smoothness value as you want to how much stabilization your video needs.
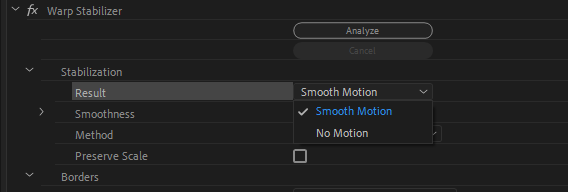
Under the Stabilization > Result > No Motion, this is used for stationary camera effect with no movement. To remove the shakiness and keep the camera moving use Smooth Motion.

Click Analyze again. And Your video should now be stabilized! Great! Your video is now stabilized.
If you are having problems with a laggy video, you can also read our article on how to fix laggy video using Premiere Pro.
Why is Video Stabilization Important?
Shaky footage isn’t new to anyone in the editing world which is why video stabilization is vital. It is possible there are some shakes in the recorded video because your tripod was outside in strong winds.
Perhaps there is a tiny shake because the gimbal wasn’t calibrated properly. If you choose to take your photos hand-held, even a shaky hand might lead to an unbalanced image. There are numerous possible causes of shaky footage. Thankfully, they can be fixed using Premiere Pro. Take a moment to read through our guide on how to add layers to your Premiere Pro project you will definitely need to as you improve your editing skills.
Whatever the reason, the issue must be resolved before you upload your videos to be viewed by people. Anyone watching the film will find unsteady visuals, uneven video, or other distracting elements annoying. It’s difficult to focus while recording, which will lead to a subpar finished product. Follow the steps mentioned in this guide to fix your shaky video problems.
Settings to Change The Application of Stabilization Effect By Premiere Pro
Some parameters can be changed to affect how Premiere Pro applies the stabilization effect. Below are a few of them.
- Smoothness
The degree of video stabilization can be changed by using the Smoothness option. The footage will appear smoother the more you apply. But, the more you apply, the more likely the software may crop or modify the video. So, apply with caution.
- Motion Removal
Premiere Pro will attempt to eliminate all motion from the video if “No motion” is selected. This is helpful if there is some camera shake in an image taken with a hand-held camera that is static. You will get some pretty odd outcomes if you use it on footage that has intentional pans and tilts.
- Smooth Motion
Smooth Motion will keep the movement of the original camera but will make the movements appear polished and smooth. The Smooth Motion is set by default in Premiere Pro.
Tips For Stabilizing Videos
The best way to make sure you get decent results is to use equipment to stabilize your video. The amount of shaking in the source video will determine how much editing software needs to repair. Below are three ways to use hardware to Stabilize your videos.
- Gimbals
Ranging from cheap to expensive, gimbals may be found in a wide variety of sizes and designs. Gimbals are controlled by technology combined with weight-balancing to produce a fluid, natural movement that maintains the camera steady even under the most difficult circumstances. For producing smooth footage, gimbals are an essential tool for filmmakers. They are worth every penny.
- Tripods
Every good photographer knows the importance of tripods. Everyone serious about recording video should own a tripod. Images will be stable if your camera—or even your smartphone—is mounted on a tripod. Compared to hand-held shooting, tripods will also enable considerably smoother and more fluid camera movement. It is simple to pan and tilt, and you should use as little camera shake as possible.
- Steadycams
You see, steadycams are more for the professional end of the market, but I will still mention them. In professional TV and film production, a steadycam is a component of a full outfit that the cameraperson physically wears. Because of steadycam complexity, it requires specialized knowledge and training to function properly. The outcomes provide the finest image stabilization available. Video stabilization isn’t the only way that Premiere Pro can serve you.
Check out our in-depth article on how to add fonts to your projects using Premiere Pro.
Leave a Reply
You must be logged in to post a comment.