An adjustment layer is a special kind of layer in Premiere Pro that allows you to apply effects to multiple layers in your project simultaneously. This feature is useful because it allows you to make global changes to your project without having to apply the same effect to each individual layer.
For instance, if you want to change the color balance of your entire project, you can add an adjustment layer and apply a color correction effect to it, and the effect will be applied to all of the layers below it in the layer hierarchy.
How to Add An Adjustment Layer in Premiere Pro
Follow these steps to create An Adjustment Layer:
Step 1:
Creating an adjustment layer with the file menu.

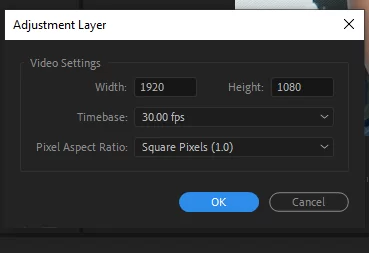
Go to File > New > Adjustment Layer. Then you’ll see the adjustment layer Layer settings. Chose your settings to match your video, then click ok.

You’ll see your adjustment layer created in the Project Panel section. And you can simply drag it into your video timeline.
Step 2:
Creating the layer by clicking the new item.
You can create an adjustment layer by clicking the New Item at the bottom corner of the project panel.
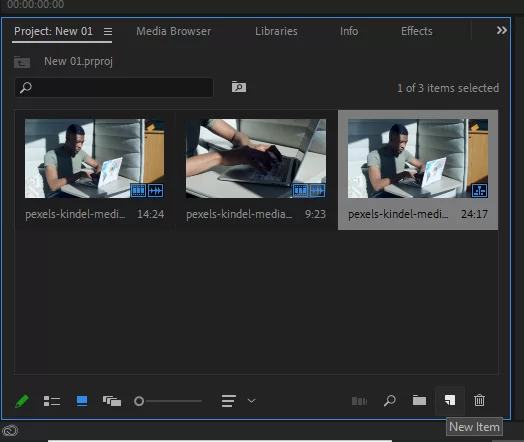
Click the New Item and click Adjustment Layer.

Step 3:
Changing the adjustment Layer setting.
When you click ok to create your layer there was a setting for the adjustment layer you need to customize the setting to match your project video.
You can also rename the adjustment layer. To do this just right-click on it and change the name.
Step 4:
Drop the adjustment layer into the timeline.
Once you’ve created the adjustment layer, you can simply drag and drop it into your timeline.
You will also like this article on video stabilization in Premiere Pro.

What Happens When You Add an Adjustment Layer?
When you use adjustment layers, large portions of your sequence can be enhanced with effects and color grading. Adjustment layers can be added to the sequence just like any other clip or piece of media. If you want to add adjustment layers you can simply search for them in your Project browser.
Did you know that adjustment layers may be quickly and easily moved, chopped, turned off, or removed because it is a separate clip? Now you know! Also, you only need to remove an effect from the adjustment layer if you added an adjustment layer that you don’t like.
Adjustment layers are very adaptable. Because of how adaptable adjustment layers are, editors have more time to express their creativity. When you use an adjustment layer, it can have an impact on other clips below it or throughout the entire cut.
Also read this informative article on how to spilt your clips in Premiere Pro.
Tips To Make Your Projects Free Flowing
As an editor, you know that there is no greater pleasure than having your workflow move freely. However, there are times when things may go south when you are editing which is why I have created the below list to help make your workflow free.
- Name Your Adjustment Layers
Do you want to know what will save you time when you are working with Premiere Pro? Naming your adjustment layers. This is especially true if you’re experimenting with different looks. Every editor should strive to improve their editing efficiency by maintaining a well-organized project browser.
- Don’t Grade Without Correcting Color
It’s imperative to complete all color corrections before adding color grades to your adjustment layer. Also, bear in mind that everything in the sequence will be affected by your adjustment layer, and your grade will fluctuate from clip to clip. So, adjust your clips before applying the grade. This applies to any editing process.
- Save as a Preset
If you are a good editor, you will know that there are some effects that you produce that you want to save. You may also want to use those effects on another project. Thankfully, Adobe Premiere Pro allows you to preset your adjustment layer effects, which will then show up in the Effect panel. You can save your work as a preset follow the steps below.
Step 1
In the Sequence, select the Adjustment Layer. Next, select each effect you want to use in your preset from the Effects Control panel.
Step 2
If you are done with step 1, step 2 involves you right-clicking and choosing Save Preset.
Step 3
Select Save after giving your preset a meaningful name.
Step 4
Now find your preset in the Effects Control panel. The preset can now be added by dragging it to another clip or adjustment layer.
Check out our in-depth article on cropping a video using Premiere Pro.
Leave a Reply
You must be logged in to post a comment.