There are many reasons for lagging Premier Pro. One of them is low system configuration. Well for this problem the only solution is to simply upgrade your computer.
Common Causes of Lagging in Premiere Pro
Other causes include insufficient hardware – If your computer’s specs do not meet the minimum system requirements for Premiere Pro, the software is likely to run slowly.
High-resolution or high-bitrate footage 4K or even 8K footage can put a lot of strain on your computer’s processor and graphics card, leading to lag.
You might also want to check your hard drive. If your hard drive is almost full, it can slow down the performance of all programs, including Premiere Pro.
Do you have multiple programs running at the same time? If you have several programs running at the same time, it can use up a lot of your computer’s resources, leading to lag.
Old or outdated drivers can cause performance issues with the software. Make sure that all of the drivers on your computer are up-to-date.
Having insufficient amount of RAM can lead to slow performance while working with large video footage.
Many users never suspect that using too many effects such as video transitions and adding fonts multiple times on on a single video clip can slow down the performance of your computer.
How to Fix Lag in Premiere Pro
If you’re experiencing lag, the first thing you should do is to check that your computer meets the minimum system requirements for Premiere Pro, and that your drivers are up to date.
You can also try reducing the resolution or bitrate of the footage you’re working with, or delete any unimportant files from your hard drive to free up space.
If the problem persists, try to render or pre-render the video footage, or try to reduce the number of effects or transitions you have applied. Also if your computer has the ability to upgrade RAM, that can solve a lot of performance issues.
The other lagging problem can be solved with a few settings.
- Create Proxy Footage
When you work with high-resolution video footage the playback will be lagging and it will slow your editing. To solve this you have to create a proxy of your video footage. That will make your editing buttery smooth.
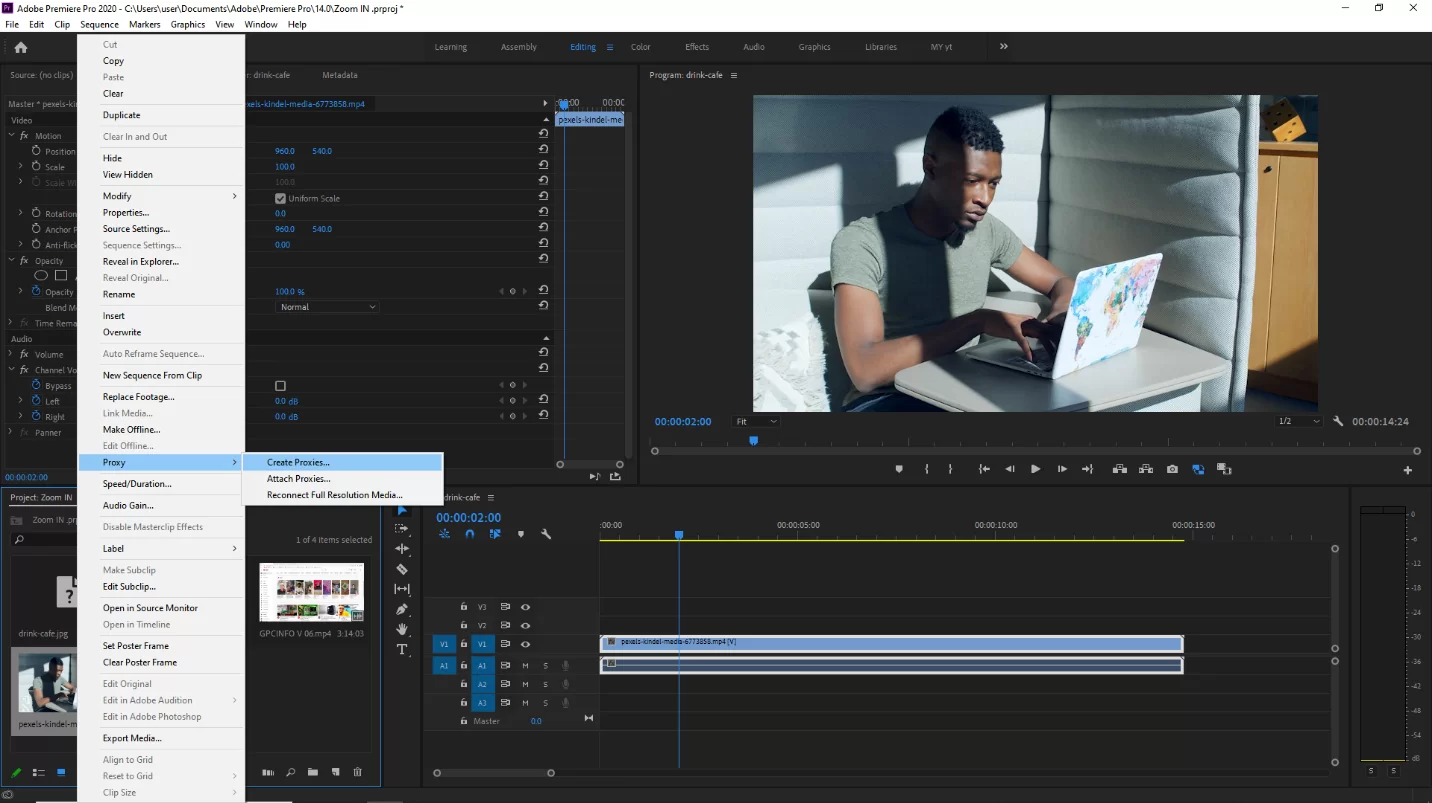
To create Proxy footage select your video from the project panel and right click on it and then go to proxy and click Create Proxy. This will open the Media Encoder and the video should be processed for proxy in the Media encoder. After creating a Proxy just drag the footage into your timeline.
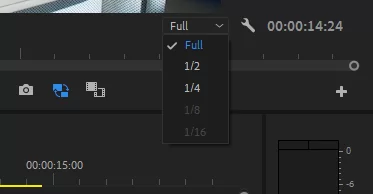
- Change Playback Resolution
Without altering its export resolution You can change the playback resolution for your video. The playback lag will be reduced significantly. To make this change, click the playback resolution dropdown menu and select any of the 4 options to reduce the playback resolution to a fraction of the native resolution (1/2, 1/4, 1/6, or 1/8).
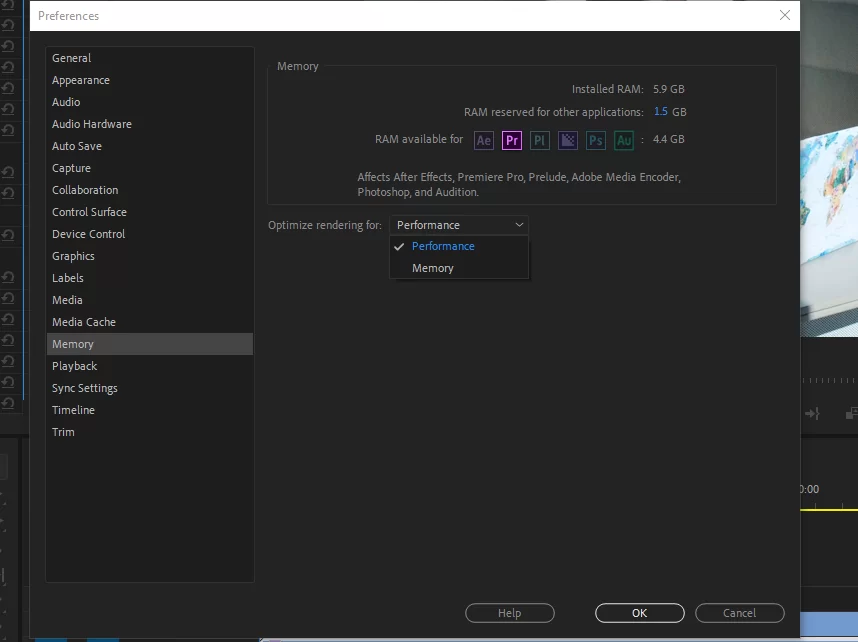
- Increase memory allowance
To increase Memory allowance go to Edit > Preferences > Memory

And here you find the memory window settings.
What To Do When Premiere Pro Lags
Laggy playback is a common complaint amongst users of Premiere Pro. Because I want to help you, I have listed some common reasons for laggy playback and how they can be fixed.
- GPU Acceleration
Ensure that GPU acceleration is selected for the Renderer. Make sure that GPU Acceleration is selected for the Renderer under Project Settings. If the GPU Acceleration option is grayed out, your graphics card drivers might need to be updated. It’s possible that Premiere Pro won’t work with your graphics card if you upgrade them but the choice remains grayed out.
- Reduce The Playback Resolution
Lowering playback resolution is crucial if you want to ensure smooth playback. This solution sounds quite apparent, but lowering the playback resolution will make a significant impact.
In the Preview Window’s bottom right corner, change the setting to 1/2 or 1/4. You can do this if you need a reminder of how the project seems. It may sound strange, but sometimes it will help you put things in perspective. It is advisable not to edit with the playback set to Full in general.
Additionally, you can make sure High-Quality Playback is turned off. Make sure High-Quality Playback is unchecked by clicking the Wrench symbol directly next to the Resolution setting.
- Save Cache File To Secondary SSD
For the best playback experience, it is advised to save your media cache files and scratch disk files to a secondary drive—preferably an internal SSD. Doing this is the single best thing you can do to improve Premiere Pro performance.
If you want to use an external SSD, be sure it is USB 3.0 compatible and that the USB 3.0 port is open. USB 3.0 is typically denoted on ports or connectors by the color blue. Just so you know, USB 3.0 is designed for efficiency and offers a fast transmission speed. You must use this if you’re editing using an external SSD.
Settings That Could Fix Laggy Premiere Pro
Below is a list of settings you can change in Premiere pro that will make your playback faster.
- Autosave Disable
Sometimes, frequent Auto Saves could cause your computer to run slowly. To disable it, go to Auto Save under Preferences.
Once you’ve done that, for your protection, set an alarm for every five to ten minutes or create a reminder on your phone to manually save the project. The alert tells you to save your work.
- Update Check
Check for operating system and graphics card updates if your current version of Premiere Pro starts to lag. Since there’s usually an update available, doing this will help you to resolve issues of laggy playback.
Once more, don’t update anything if you’re in the middle of a project and everything is running smoothly.
Check out our in-depth guide on video rendering using Premiere Pro.
Leave a Reply
You must be logged in to post a comment.