DaVinci Resolve video exporting can be challenging, especially for new users. However, the procedure may be made a lot simpler with the appropriate information and a few pointers. In this article, we’ll walk you through the steps of exporting your videos from DaVinci Resolve and offer some extra tips to make the procedure go as smoothly as possible.
Understanding the Export Process
The export process in DaVinci Resolve begins by selecting the desired clips or sequences that you want to export. Once you have selected your clips, you can then choose the format and settings for your export.
There are several formats available for exporting in DaVinci Resolve, including:
- QuickTime
- AVI
- MXF
- ProRes
- H.264
- H.265
Each format has its own set of settings, such as resolution, frame rate, and bitrate. It’s crucial to consider the intended use of the movie while selecting the format and export options. For instance, you might want to select a higher resolution and bitrate when exporting a video for a film festival to ensure the finest quality. On the other side, you might wish to select a lesser resolution and bitrate when exporting a video for a website to reduce the file size and speed up loading.
How to Export Files in DaVinci Resolve
Using the procedures below, you may export files from DaVinci Resolve:
First, go to DaVinci Resolve’s Deliver page.

Next, select Custom from the Render Settings menu. Put in the appropriate Filename and choose the File Location.

Click on “Render”

Make sure Export Video is selected under the Video Tab.
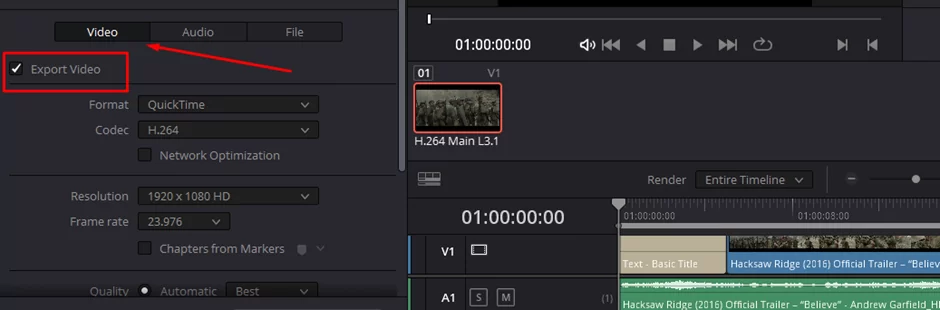
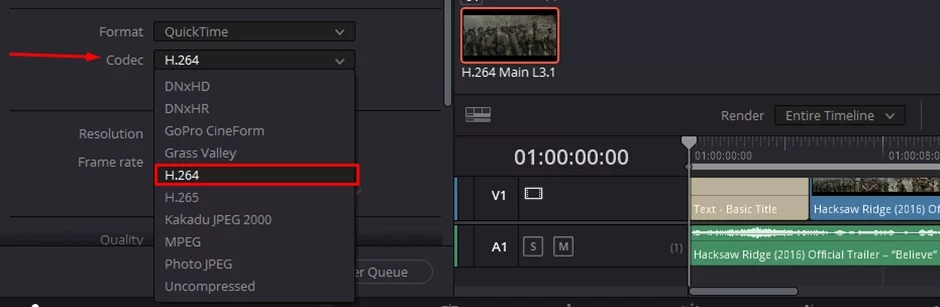
Choose the file type you want to export to from the Format drop-down menu.

Pick H.264 from the Codec Drop-Down menu (preferable when exporting MP4)
Choose your desired Frame Rate and Resolution.

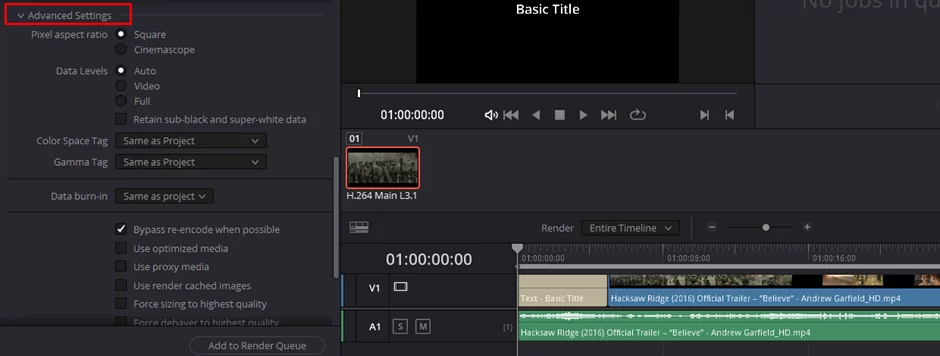
These will be enough for you to export your videos. However, if you need to explore more settings, go to Advanced Settings to see if there’s anything you might need that pertains to your project.
Click on “Add to Render Queue” to start the process of exporting your project.
Also read: How to use green screen in DaVinci Resolve

Advanced Format and Settings
While the basic format and settings options in DaVinci Resolve may be sufficient for many exports, there are also advanced options available for those who need more control over their exports. These include options such as:
- Color Space: Choose from a variety of color spaces, including RGB, YCbCr, and more.
- Bit depth: Choose from 8-bit, 10-bit, 12-bit, and more.
- Frame rate conversion: Convert your footage to a different frame rate, such as 24fps to 30fps.
- Resolution scaling: Scale the resolution of your footage, such as 1080p to 4K.
These advanced options can be accessed by clicking on the “Settings” button in the export window and can help you achieve the exact look and feel you want for your exported videos.
You can also check out our detailed guide on how to crop a video in Davinci resolve
Exporting for Different Platforms
Different platforms have different requirements for the videos that are uploaded to them. For example, YouTube has a maximum file size and bitrate, while Vimeo has different codecs supported. When exporting for a specific platform, it’s important to keep these requirements in mind.
To help with this, DaVinci Resolve includes preset export settings for popular platforms such as YouTube, Vimeo, and Facebook. These presets can be found by going to File > Export > Platform, and can help ensure that the platform will accept your exported videos without any issues.
Tips and Tricks
- Always check your exported videos before using them in the final production. This can help you catch any issues before they become a problem.
- Use the “Render Cache” option in DaVinci Resolve when exporting. This can significantly speed up the export process, especially for large or complex projects.
- If you are exporting a video with multiple audio tracks, select the correct audio track in the export settings.
- Use keyboard shortcuts to speed up your workflow when exporting. For example, you can use the “Ctrl + Shift + E” shortcut to quickly access the export window.
- Consider using third-party tools such as Handbrake or FFmpeg to convert your exported videos to other formats or to further optimize them.
- If you are exporting a video with subtitles, include them in the export settings. DaVinci Resolve supports multiple subtitle formats, such as SRT and VTT.
- If you are exporting a video with multiple audio tracks, you can also choose to export each audio track separately to have more control over them.
- Always keep a backup of your original footage and project files, in case something goes wrong during the export process.
By following these tips and tricks, you can save time and effort when exporting your videos from DaVinci Resolve, and ensure that your exports are of the highest quality.
Also read: How to add transitions in Davinci resolve
Remember: It is always important to choose the right format and settings for your intended use of the exported video and to test your exported videos before using them in the final production. With this guide, you should be well on your way to exporting high-quality videos from DaVinci Resolve.
Conclusion
Although exporting videos using DaVinci Resolve can initially look scary, with the appropriate knowledge of the procedure and the options available, it can be a simple effort. With the help of this instruction, you will be able to export your movies with confidence and convenience whether you go for the conventional approach or the Deliver Page.