Green screen technology is undoubtedly a highly advantageous tool when it comes to filmmaking. If you find yourself unable to afford the background you desire or need to eliminate visible equipment from a shot, worry not! Simply employ green screen technology, and voila, you can achieve your desired result in no time.
What is Green Screen?
Known in the film industry as chroma keying or color keying, green screen technology is an innovative technique that is easier to use than you may realize. It operates by layering; a block color screen is positioned behind a foreground or person, and through digital means, the block color can be removed, leaving only the transparent image. This makes it possible to add special effects and backgrounds during post-production.
Why Opt for Green Screen?
The use of green screens is a highly efficient technique for budget-conscious filmmakers. Not all filmmakers have the means to hire numerous extras or to shoot in large, open spaces. Similarly, a story set in a time period of the past may not have the budget for intricate physical sets, and green screen technology is invaluable in creating the illusion of time travel with digital scenery.
How to Green Screen in DaVinci Resolve
To use the green screen on DaVinci Resolve, we will have to follow a few stages to achieve this. Each phase has its specific steps and we will show you exactly how to do that in this part of the guide.
Screen Replacement
The utilization of green screen technology to replace screen content on various devices, including laptops, tablets, phones, and televisions, is a commonly adopted practice. In this context, we will be replacing the green screen background of a bear.
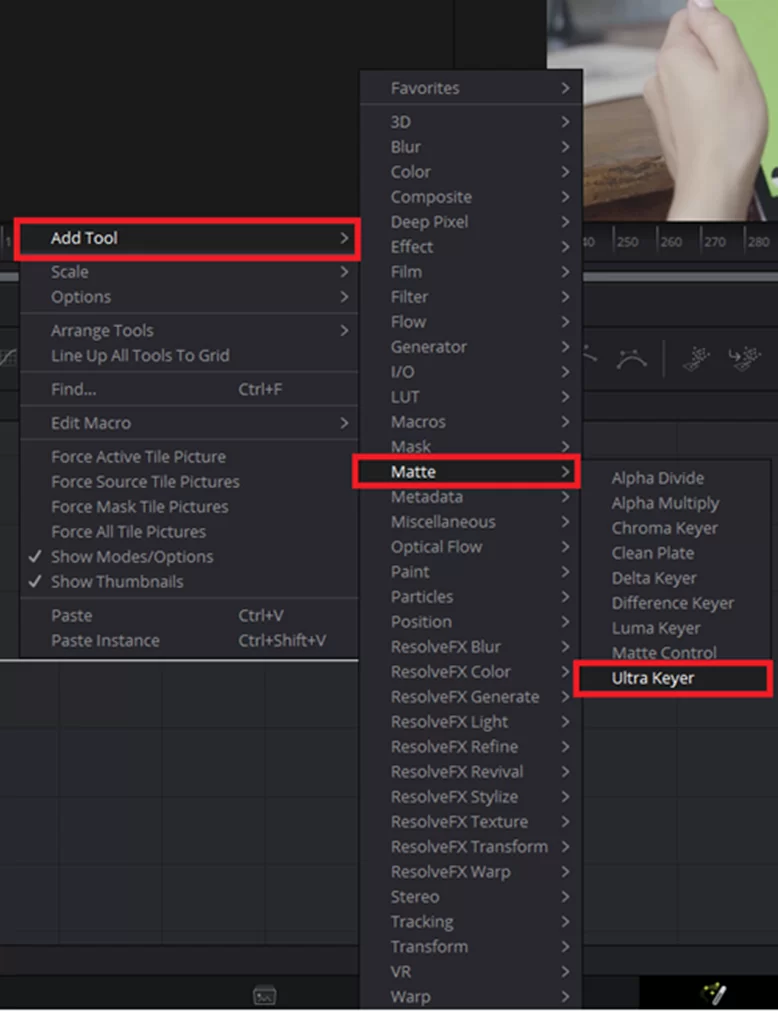
To remove the key, first, open Fusion and right-click on the nodes. Next, select “Add Tool,” followed by “Matte,” and finally “Ultra Keyer.”
You can also check out our in-depth article on how to add music clips in Davinci resolve.
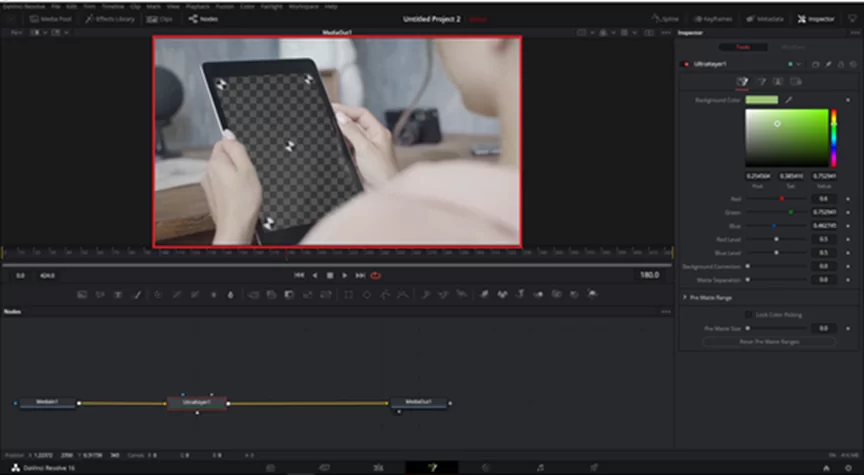
Next, choose your desired background color. To do this, a pop-up window with a color picker will appear. Select “Pick Screen Color,” and then select the green screen.

Once you have selected your preferred color and clicked “OK,” the green screen will be instantly removed from the footage.
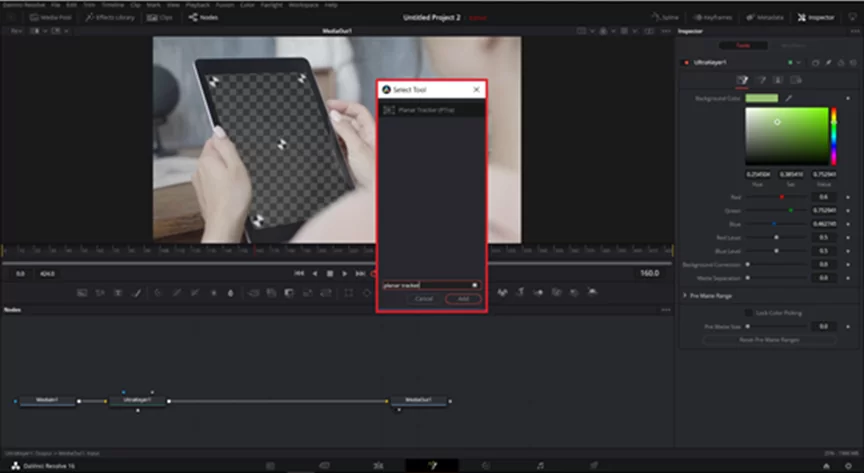
The next step is to add a Planar Tracker Tool. To do this, while Ultra Keyer is selected, press “Shift + Space” to access the Tool search function. Then, search for Planar Tracker and click “Add.”

Now, while selecting the Planar Tracker Tool, use the “Click Append” tool located at the top left corner of the viewer to trace around the tablet.
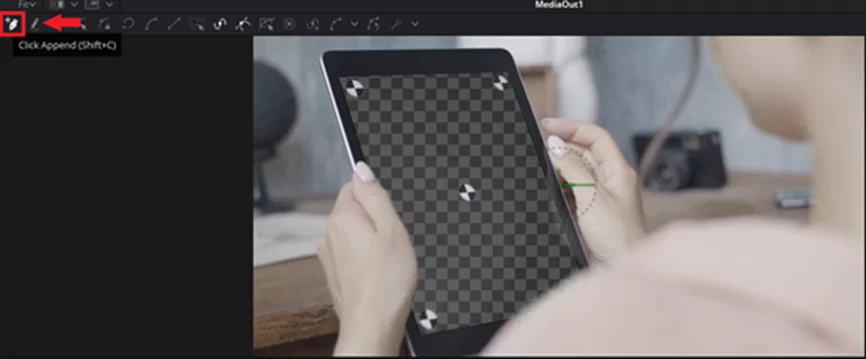
Begin tracing around the device using the Click Append tool, and ensure that the shape is fully closed.

Next, select the keyframe where you want the tracking to occur. Move the playhead to the desired keyframe. In this example, we have set the reference keyframe to 160.

To use this keyframe as the reference for the tracker, navigate to the Inspector panel and set the Reference Time to the keyframe you want the tracking to start from.

To track the object until the end of the clip, select the Planar Tracker tool and click on the Analyze forward button located in the lower-left corner of the viewer. The tool will start analyzing the movement of the object from the reference keyframe to the end of the clip.

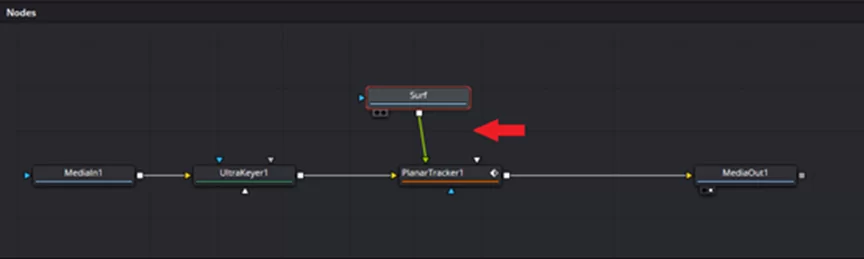
Once you select “Track to end”, the Planar Tracker tool will turn green, indicating that the tracking process is complete. The tracker itself will also turn green to indicate that it has successfully tracked the selected area.

To add the clip that you want to be seen inside the tablet, first, open the Media Pool. You can do this by clicking on the Media Pool icon on the bottom left corner of the screen or by pressing Ctrl+1.
Once the Media Pool is open, you can import your footage by clicking on the Import button located at the bottom of the Media Pool window. From there, you can navigate to the location where your footage is stored and select it. Then, click on Open to import the clip into the Media Pool.

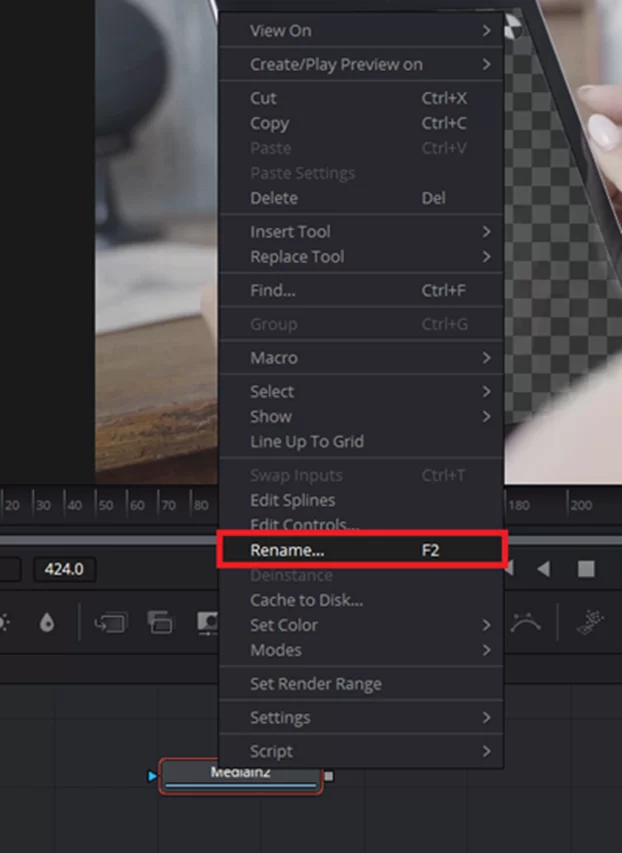
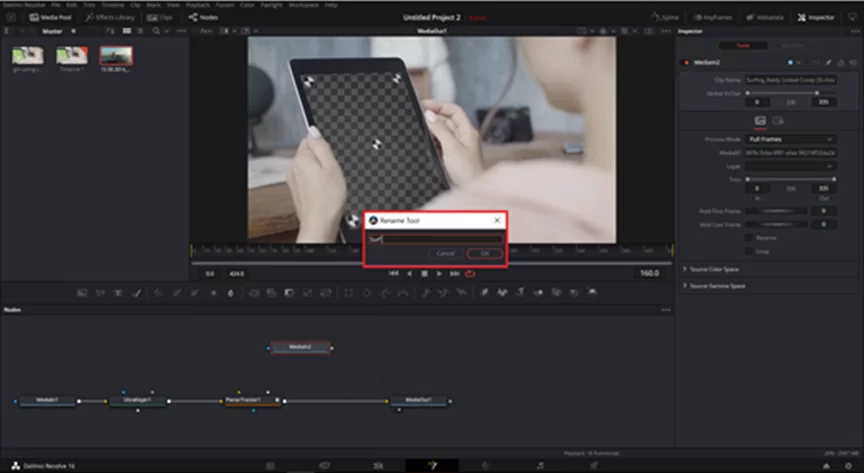
After importing your footage, you can drag it to your node graph. It will be automatically named MediaIn2. To avoid confusion, you can right-click on the node and select “Rename” or press F2 on your keyboard to rename it.
Next, connect your second footage to the Planar Tracker tool by dragging the output of MediaIn2 to the green triangle input of the Planar Tracker in the Node Editor.
To change the Operation Mode to Corner Pin, select the Planar Tracker tool and go to the Inspector panel. From there, locate the Operation Mode dropdown menu and select Corner Pin.

You’ll notice that the 2nd footage is now shaped like a trapezoid.

To make the shape fit the tablet, you can adjust the position and size of the trapezoid. You can drag the corners and edges to match the outline of the tablet. You can also adjust the rotation of the shape if necessary.

To improve the look, we will adjust the merge mode to BG over FG in the Inspector panel.

The changes should take effect immediately once you adjust the Merge Mode to BG over FG.

To remove the trackers, select the Planar Tracker tool and go to the Keyframes tab in the Inspector. From there, select all the keyframes and hit Delete Keyframes. This will remove the trackers from your final output.
Also check out this information packed article on how to add transitions in Davinci resolve.
How To Remove Trackers
When working with green screen footage that has trackers, you’ll need to remove them before finalizing the composite. To do this, you’ll need to add a few tools to your node graph: a Planar Transform Tool, a Polygon Tool, and a Transform Tool.
The Planar Transform Tool allows you to adjust the overall position and rotation of the green screen footage, while the Polygon Tool allows you to create a mask around the tracker. Finally, the Transform Tool enables you to adjust the position and rotation of the tracker mask.
With these tools, you can create a clean composite without any visible trackers.
You can also see our step-by-step guide on how to use Chroma key in Davinci resolve.
The process
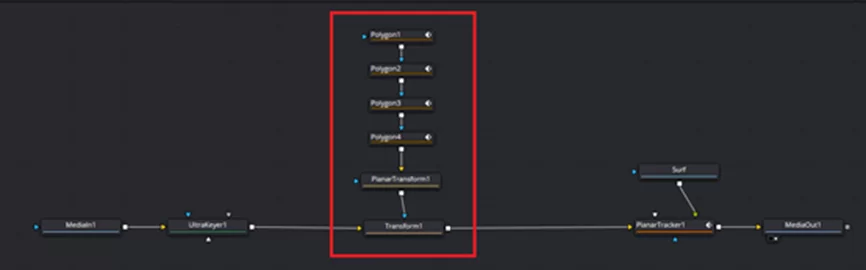
To remove the trackers, you need to add a Planar Transform Tool, Polygon Tool, and a Transform Tool to your node tree.
To do this, search Shift + Space on your keyboard for these tools. Then, connect them to each other and connect them between the Ultra Keyer and Planar Tracker Tool. Make sure you follow the node tree below and connect each tool to the correct color input.
To remove the trackers, start tracing around them using the Polygon Tool. Each tracker corresponds to a polygon mask, so you will need to trace around all the trackers individually using separate polygon masks.
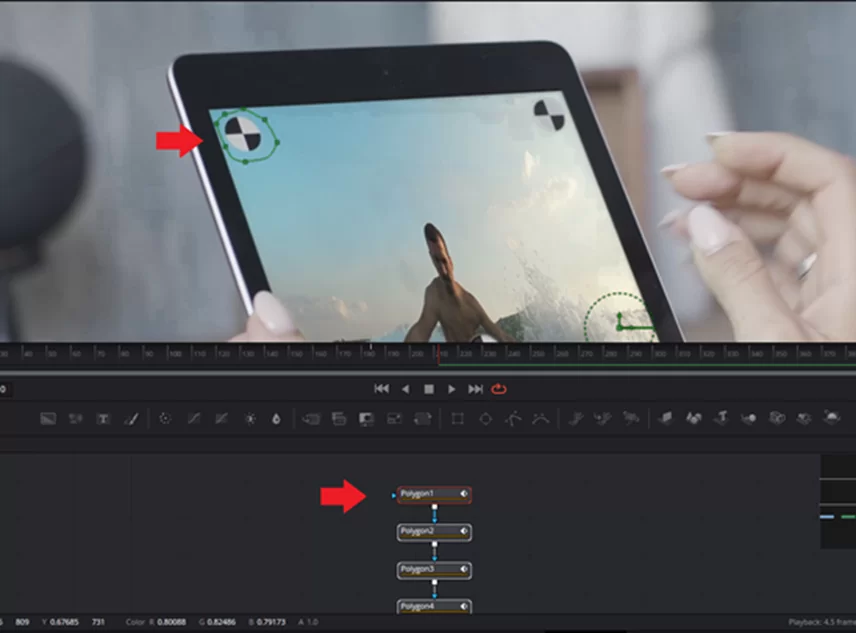
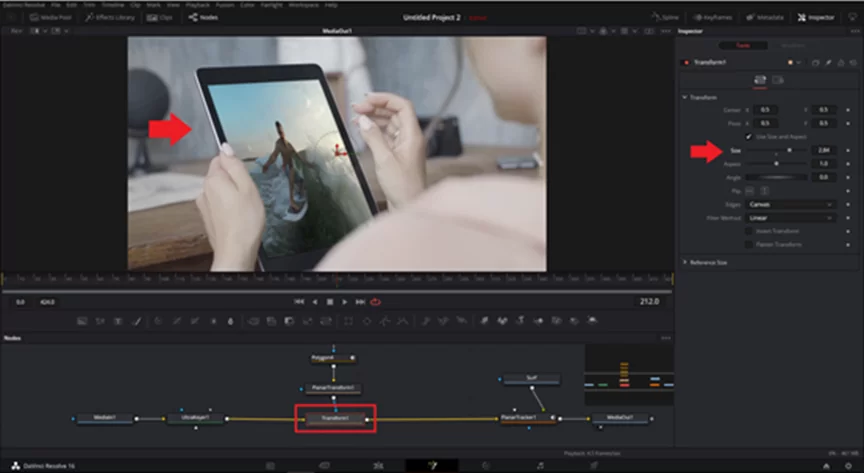
Once you’ve traced all the trackers, select the Transform Tool and increase the size of the trackers by adjusting the Size option found in the Inspector. This will help ensure that the trackers are completely covered and removed from the final output.

After adjusting the size, you may need to make further adjustments to the polygon shape from frame to frame as the trackers move. To do this, you can use the keyframe function in the Polygon tool.
Select a keyframe on the timeline and adjust the polygon shape as needed. Then, move to the next keyframe and repeat the process until you have adjusted all the frames where the trackers are visible.
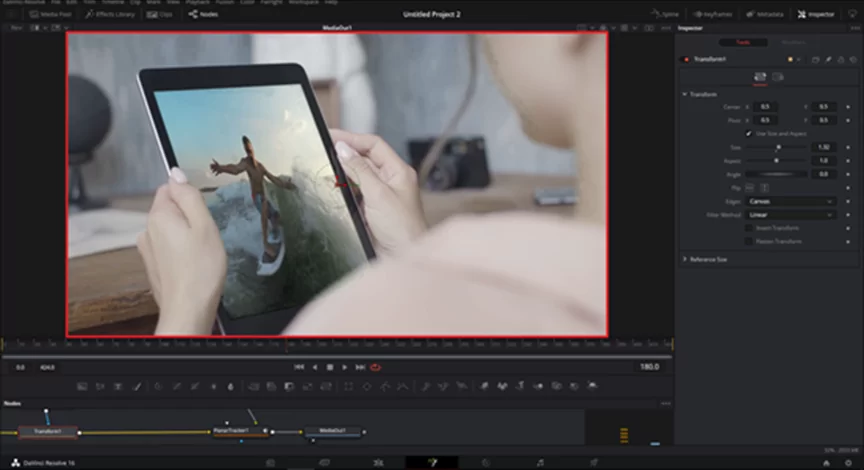
Great job! You have just successfully completed the screen replacement effect using the Planar Tracker tool and removing the trackers.
Conclusion
Learning how to remove a green screen in DaVinci Resolve is definitely a valuable skill for any video editor. With its powerful features and tools, it can make the process of keying and compositing much easier and more efficient. And as more and more productions are using green screens for their projects, knowing how to properly remove it can give editors an edge in the industry. So, it’s definitely worth taking the time to learn and master this skill in DaVinci Resolve.