In the world of video editing, one of the most important techniques to master is freeze-framing. Freeze framing allows you to pause a video clip at a specific point, creating a still image that can be used for a variety of purposes, such as creating dramatic effects, highlighting a specific moment in time, or making a transition between two scenes.
DaVinci Resolve is one of the most popular video editing software programs available today, and it offers a range of tools for freeze-framing your clips. In this article, we will walk you through the complete process of freeze-framing in DaVinci Resolve, from start to finish.
What is a Freeze Frame?
A freeze frame is a still image that is displayed in a video for an extended period of time. It is used to highlight a particular moment or detail in a video and can add an extra dimension of creativity to your projects.
Also read: How to crop a video in Davinci resolve
Step-by-Step Guide to Freeze Frames in Davinci Resolve
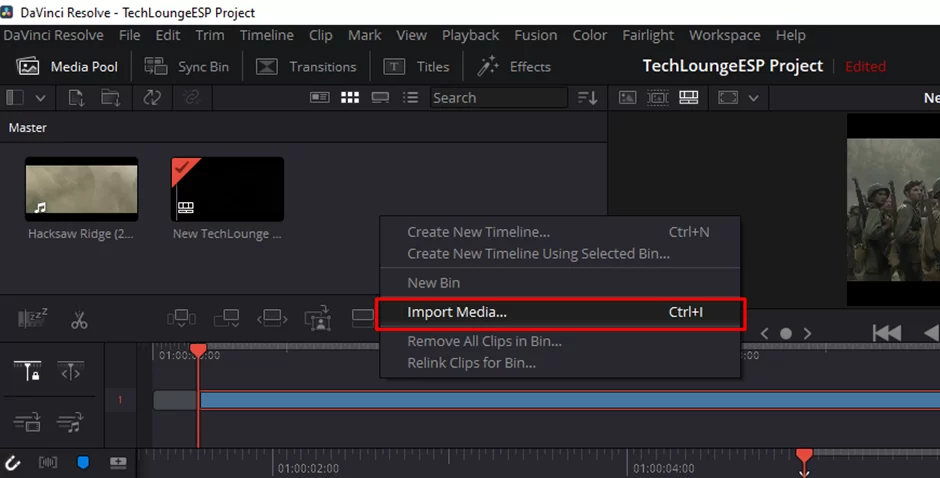
Step 1: The first step in creating a freeze frame is to import the footage you want to use into DaVinci Resolve. To do this, click on the “Media” tab in the bottom left corner and select “Import Footage.” Select the video file you want to use and click “Import.”
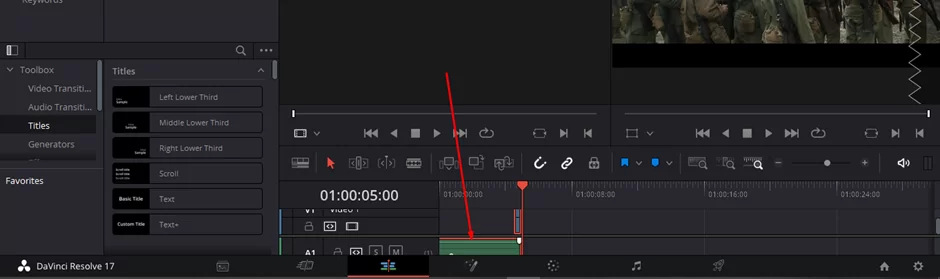
Step 2: Navigate to the frame you wish to freeze; drag the play head to the appropriate frame. Just above the timeline, you’ll find the “Cut” option. Simply click on it.
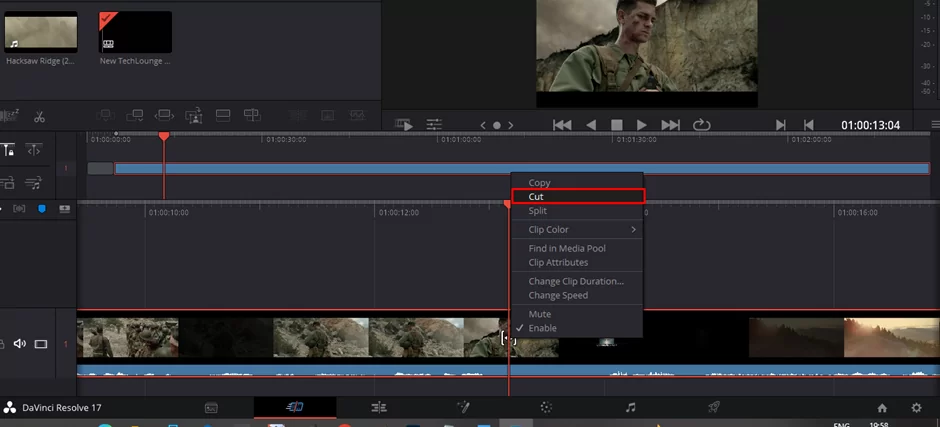
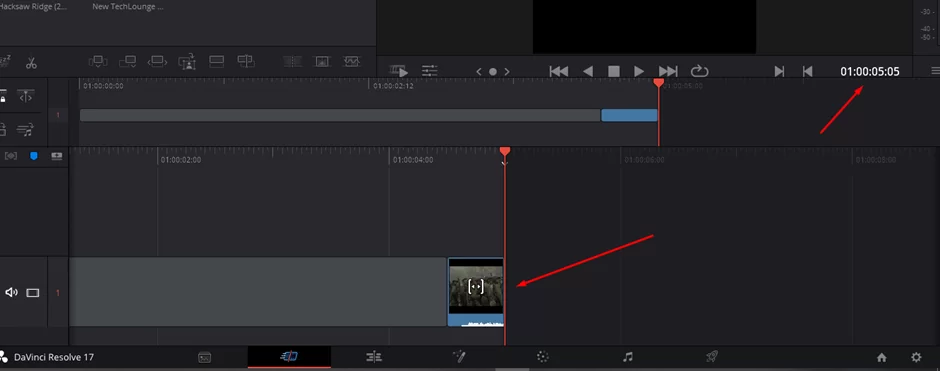
Step 3: Cut the movie by clicking the left mouse button after choosing the cut tool. By using the right arrow key, you can skip a frame and restart the video clip. This will make the video without that specific frame.
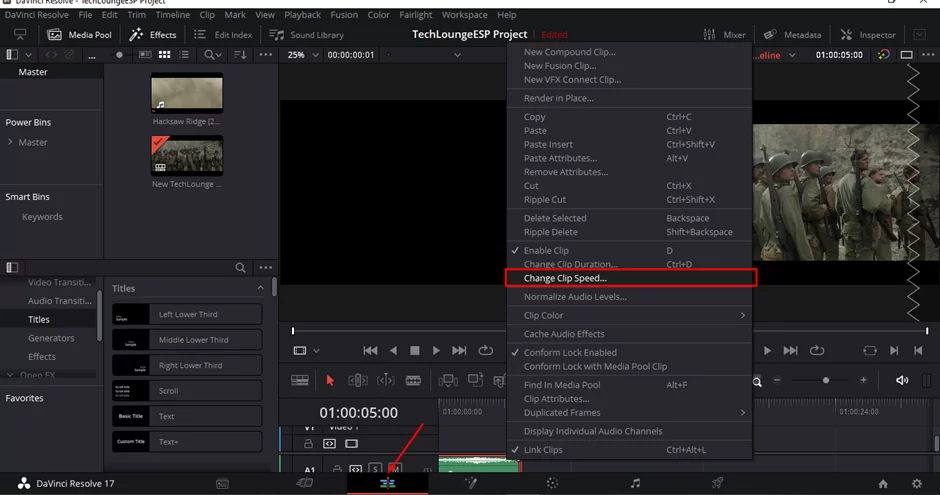
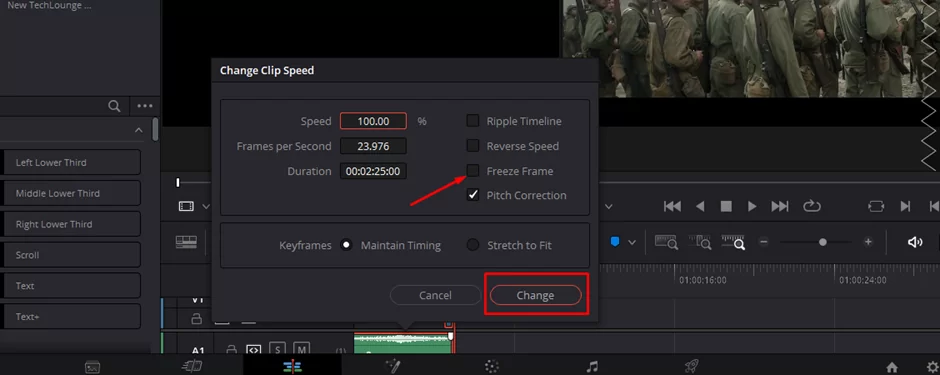
Step 4: Change clip speed by selecting “Change Clip Speed” from the context menu of the right-clicked frame that you have already clipped.
Step 5: Select “Change” after selecting “Freeze Frame” from the drop-down menu. By repositioning the frame on the timeline, you may change the frame’s duration to suit your requirements.
Step 6: Once finished, save the video by selecting File > Save Project.

Enhancing Freeze Frames with Keyframe Animation
In addition to simple freeze frames, Davinci Resolve also allows you to add keyframe animation to your freeze frames. This means you can make adjustments to the freeze frame over time, such as changing its size, opacity, or position.
To add keyframe animation to a freeze frame in Davinci Resolve, follow these steps:
Select the freeze frame clip in the timeline
Go to the “Effects Library” and add the “Transform” effect

In the “Inspector,” click on the “Video” tab
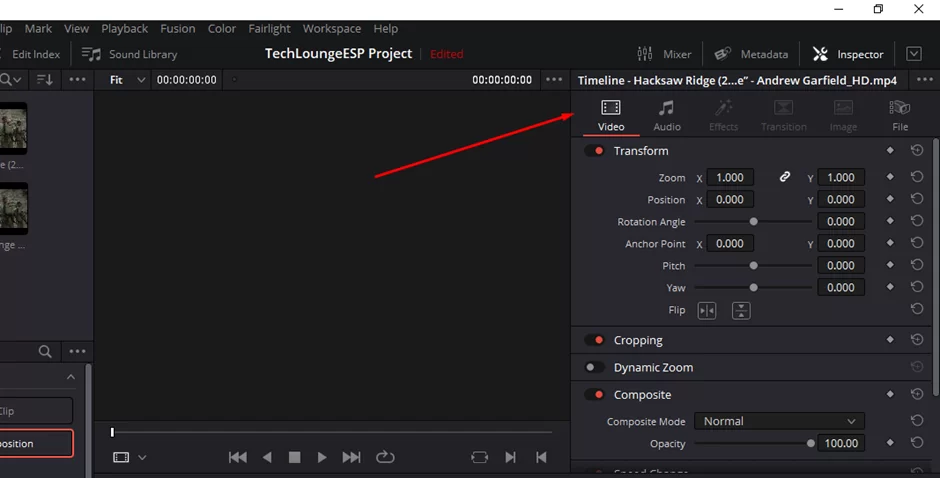
Set keyframes for the properties you want to animate (such as position, scale, and opacity). After that, preview your animation to see the changes over time.
With keyframe animation, you can take your freeze frames to the next level and create even more impressive video projects.
Also check out tthis guide on fixing Davinci resolve crashes
Some Additional Customizations You Can Add to Your Frame
Applying Transitions to the Freeze Frame
To add a transition to the freeze frame, select the freeze frame clip in the timeline, and then navigate to the Effects Library tab. In the Effects Library tab, find the transition that you want to apply to the freeze frame, and then drag and drop it onto the freeze frame clip in the timeline.
You can preview the transition by clicking on the Play button in the DaVinci Resolve interface. If you are not satisfied with the transition, you can adjust the duration or choose a different transition by repeating the process.
Adding Text to the Freeze Frame
Adding text to your freeze frame can help to reinforce your message, or provide additional information about what’s happening in the scene. To add text to your freeze frame, select the freeze frame clip in the timeline, and then navigate to the Text tab in the DaVinci Resolve interface.
In the Text tab, select the type of text that you want to add (such as a title or a subtitle), and then click on the Add Text button. You can customize the text, including the font, size, color, and alignment, to match the look and feel of your project.
Once you have finished customizing your text, you can preview the freeze frame with the text by clicking on the Play button in the DaVinci Resolve interface. If you are not satisfied with the text, you can make further adjustments until you are happy with the final result.
Rounding Up
Freeze framing is a powerful technique in video editing that allows you to pause a video clip at a specific point in time, creating a still image that can be used for a variety of purposes. In this article, we have walked you through the complete process of freeze-framing in DaVinci Resolve, from start to finish, including importing your video clip, finding the frame that you want to freeze, adding a freeze frame to the clip, adjusting the duration of the freeze frame, applying transitions, adding text, and exporting the final result.
With the steps outlined in this article, you should now have a good understanding of how to freeze frames in DaVinci Resolve, and be able to create professional-quality freeze frames in no time!