Gimp is one of the most widely known images manipulation raster editing software. Gimp is a second alternative to the popular photoshop and is preferred by many because of its simplicity. Gimp is a cross-platform program that can be used on Linux, Windows, and macOS.
Are you an illustrator, photographer, or graphic designer? Gimp provides great tools to help you get what is in your head out into the computer screen. The clone tool, move tool are some of the tools that come with Gimp to make your editing process very easy.
To start using GIMP, you have first to install it.
How To Install Gimp on Windows
Follow the steps below to install Gimp on windows.
Step 1
Open any web browser and go to the GIMP website.
Step 2
Next, select the Download button.
Step 3
The next page will now open; click directly on GIMP to download.
Step 4
Locate and launch the executable file that was downloaded to your computer.
Step 5
It will ask for your approval before making any changes to your system. Select “Yes”
Step 6
Select your preferred setup language on the following screen by clicking OK.
Step 7
The setup process will now begin. Click Customize to change the setup’s fundamentals.
Step 8
Click Next on the License Agreement screen that appears next.
Step 9
On the component selection screen that follows, all options are already checked; click the Next button without making any changes.
Step 10
If you want your application to run on your desktop, the following screen will ask for a desktop icon. After that, select that column and press Next.
Step 11
The configuration is now prepared for installation. Select Install.
How To Install Gimp on Mac
Follow the steps below to install Gimp on MacOs.
Step 1
Start by opening any web browser and go to the GIMP official website.
Step 2
A new web page will open after clicking the Download option.
Step 3
Select macOS and wait for the installer files for macOS to download.
Step 4
Select the Direct Download GIMP option.
Step 5
After the file has begun to download, look for the executable file on your computer and launch it.
Step 6
Click and hold GIMP, then drag it to Applications to begin the installation process.
Step 7
Open gimp by clicking on the launchpad and then searching for it.
Step 8
GIMP will begin loading and initializing in this final step.
Step 9: GIMP was successfully launched.
Now that you have installed Gimp on your computer, the question is how to fire it up.
How to Start GIMP
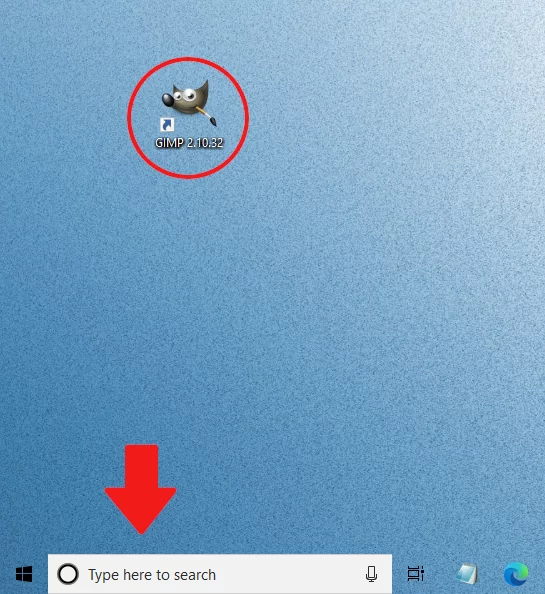
1. Once you have installed gimp, find the desktop shortcut and double click on that to open GIMP. You can also click the search bar at the bottom, then type gimp, and open it that way.
How To Fix Gimp Not Running On Windows 10
If you have a problem with your Gimp not working in your windows 10, follow the steps below to fix it.
Step 1
Using the command prompt or by modifying the shortcuts, launch Gimp. This causes a side window containing console messages to open in Windows, which will reveal information.
Step 2
Erasing the sessionrc file in your Gimp profile will stop the program from saving off-screen window positions—This is where Gimp keeps window positions.
Step 3
If you delete or rename the Gimp profile, Gimp will create a “new” one, enabling it to display its windows. You can try reinstalling the Gimp, but it rarely solves problems because it preserves the current Gimp profile, which is typically the problem.
Now that you know how to fire up your Gimp, check out our in-depth article on how to outline text in Gimp.
Leave a Reply
You must be logged in to post a comment.