In InDesign, the term “slug” refers to an area outside of the document’s defined page boundaries that is used to store information such as document title, date, and other production-related details.
This area is typically not visible when the document is printed or exported to a PDF, but it can be useful for keeping track of important information during the design and production process.
The slug area can be accessed and edited through the “Document Setup” dialog box in InDesign, and the information stored in the slug can be used in the layout of the document, such as by including the document title in the header or footer.
As used in modern document printing workflows, slug refers to the area at the outermost edge of his InDesign printed document. The slag area is printed but is trimmed along with the bleed area during the page trimming process to determine the final size of the document (also known as the “bleed size” of the document). No, it’s different from InDesign’s bleed.
Adding a Slug in InDesign
If you want to add a slug area to your InDesign document, the easiest way to do this is to set the appropriate dimensions when creating a new document.

If you look closely at the New Document window, you’ll see an expandable section labeled Bleed and Slug. Click the title to expand the section fully and you’ll see several text entry fields that you can use to specify the size of the new document’s slug area.
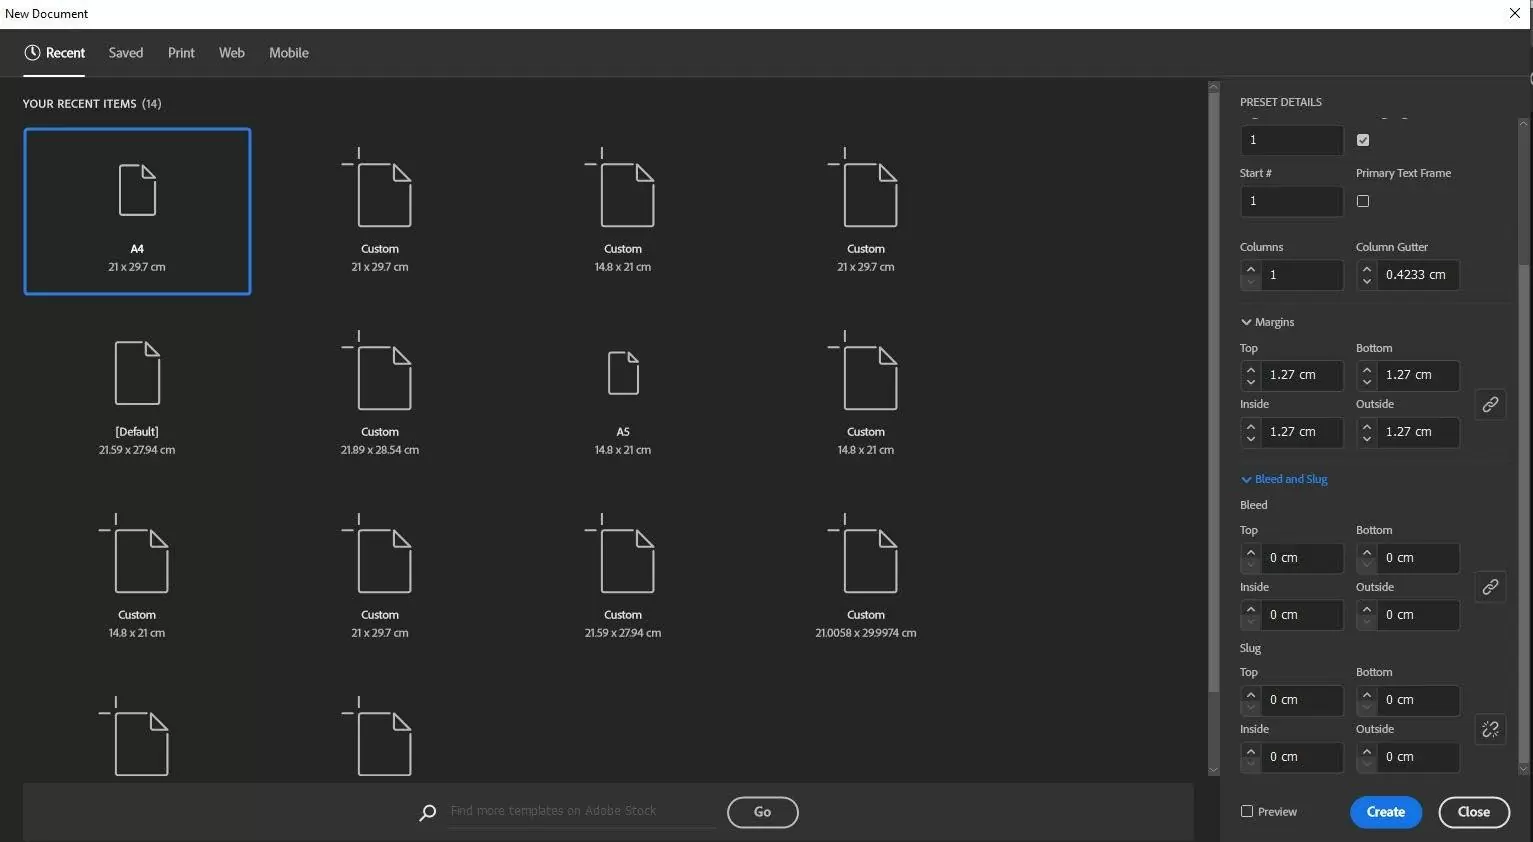
In this way, you can set the slug area of your document
We aalso recommend you see our guide on how to change text color in InDesign.
How to Find Slug in InDesign?
Unless you are actively looking for a slug in InDesign, you may have a hard time finding it. This is because Slug is found in an inconspicuous location in the New Document dialog box. When you go to File> New Document, you will see the normal setting for page size and margins.
However, if you look toward the button of the dialog box, you will notice an area called Slug and Bleed. You will see the values that can be defined for both Slug and Bleed when you click the disclosure triangle in the section.
You can set a Slug to appear on the top, bottom, left, and right side pages in a non-facing document. You can also set it to appear on the outside in a facing-page document using Slug values. It is important to note that the inside value may be a bit deceptive.
This is because, for a facing-page document, the inside Slug can only appear on the last and first pages of the document thanks to the spine. However, if you turn the preview on in the New Document Dialog, you will see how the Slug will appear on your document. You can set the size of the Slug depending on what you want to do.
Check out our in-depth guide on How to Make a Triangle in InDesign
How To Add Information To The Slug
When you are designing for a client, it is normal to convey or get information about the project from the client. However, getting the needed information over the phone may be a bit challenging for you and your client. This is where Slug comes in.
When the information is put into the Slug, both you and your client will be able to see where questions and directions are needed. There is no big deal to adding information to the Slug area because it can be done using the tools you are already acquainted with. Text, graphics, and native InDesign objects can all be used.
How To View The Slug Area
When you are using Normal View, the slug area is easy to see. However, when you switch to the preview mode, the Slug area will become hidden, displaying only what will be printed in the document.
In Normal view, the slug area is visible. You can click and hold on to the preview button and it would help you see a couple of additional views that will help you when you are viewing a project. Some of them are bleed mode and slug mode.
In bleed mode, in addition to the artwork that will appear on the finished product, the document’s designated bleed region is also visible.
The artwork that will appear in the finished product and the slug area specified in the document are both displayed in slug mode. This mode is useful if you want to view both the content that will print and the content in the slug area. This allows you to keep adding or changing the content there. When you click the preview button after selecting the slug option, it will be the default preview mode.
Did you enjoy reading this piece? You will also enjoy our step-by-step on How To Turn Off Hyphens In InDesign.
Leave a Reply
You must be logged in to post a comment.