Images may be shared through email when resized, making them suitable for usage on various websites and blogs. One of the well-known tools for scaling images is GIMP. GIMP, which stands for GNU Image Manipulation Program, is a free open-source software program that provides sketching, image manipulation, and other features. This article will show you how to resize your image in GIMP.
Resizing Your Image in GIMP
You may edit your photos using the tools that are readily available on Gimp. You have the option to modify layers to zoom in and out of your image, among many other things.
The software’s batch-processing capability allows you to handle several files at once. GIMP picture resizing and other application features are available for Windows, Mac, and Linux systems. Let’s get started.
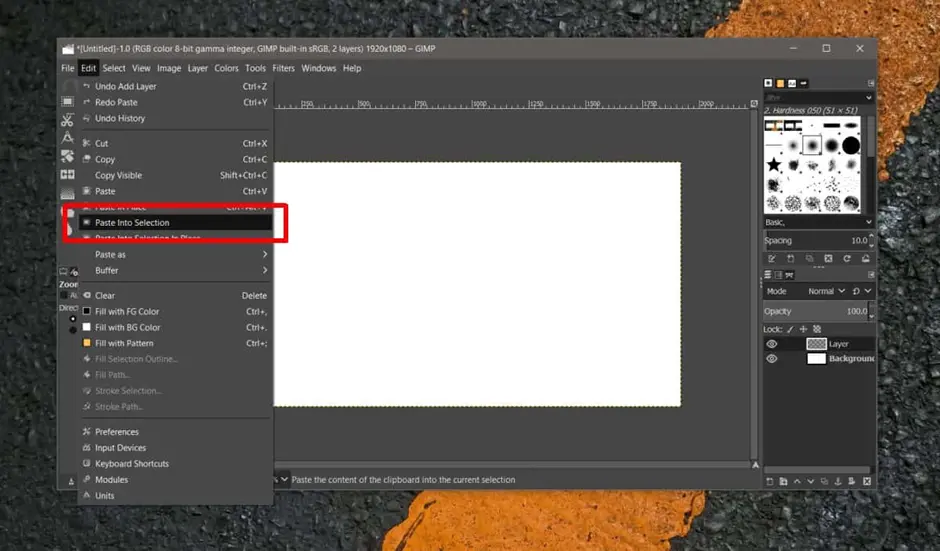
Add a new layer to GIMP, open it, then paste or draw something on it.
Here, we’ll compare two approaches to scaling the image: a defined width/height approach and a freehand approach.
Go to Layer > Scale layer after pasting the object to a layer.
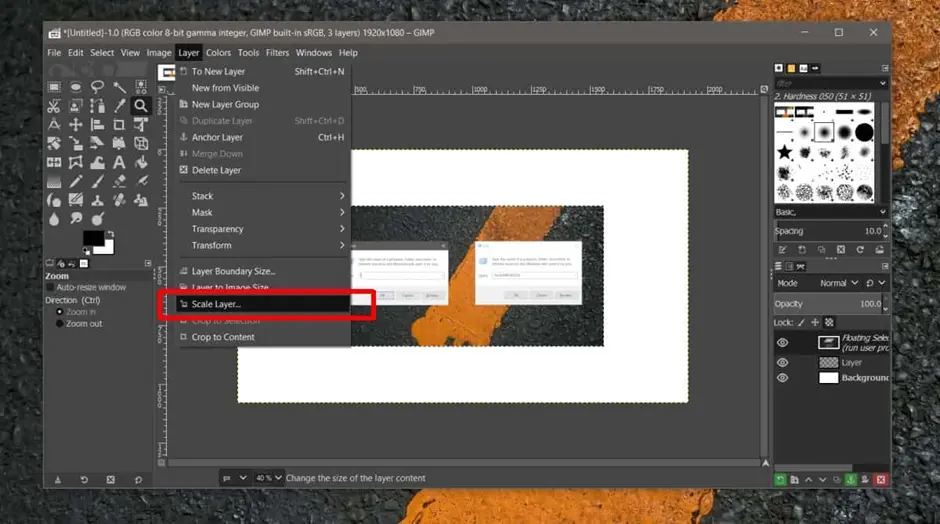
Select the image’s width or height in the little window that appears. The image should be scaled proportionally. Click the Scale button after entering the settings.

Select the layer and use the Shift+S keyboard shortcut to resize a picture freehand, that is, by dragging its corners rather than typing in a number for the new size.
A similar window will appear, but this time, the item’s corners will be exposed for dragging. To resize the picture, click and drag the elements.

How Can I Resize an Image Without Sacrificing Quality?
You may do free transformations in GIMP nearly as you would in Photoshop using the Unified Transform tool. It is conveniently located in the toolbox panel, and you can access it right away by using the shortcut keys Shift + T (likewise, on a Mac running GIMP, Command + T) on your keyboard.
Check out our detailed article on how to curve text in Gimp and see more uses for the Transformation Tool.
Saving Your Image After Resizing
Use the following steps to save your resized image in a JPEG format
- Choosing File > Export As.
- To give the image a name and location, use the “Export As” box.
- To view the list of supported file formats, click Select File Type.
- Select JPEG Image from the list by scrolling down.
- To see the Exported Image as a JPEG dialog box, select Export.
- Choose optional JPEG options.
The following steps will guide you on how to save your GIMP resized images as PNG
- Open GIMP and the XCF file you want to convert.
- Choosing File > Export As.
- Click on “Select File Type” (above the Help button).
- Select Export after choosing PNG Image from the list.
- Select Export once again after making the necessary adjustments.
Resizing a Selection in GIMP
Click on any of the transform handles and drag your cursor inwards while holding down the Ctrl key to scale the selection down (to scale it from the center). Simply let go of the Ctrl key to stop scaling from the center.
Use Case for Resizing Your Image
You can use GIMP to resize your Twitter avatar to a precise size if you have a saved copy on your computer. After resizing the image, you may upload it again to Twitter to serve as your profile picture. Avatars on Twitter are automatically scaled to 48 × 48. Resize the image to fit these dimensions to maintain the image’s quality.
Conclusion
For the most part, GIMP may be used immediately by Photoshop users. Although you won’t need to learn any new tools, you’ll discover that many of the keyboard shortcuts you mastered for using Photoshop comfortably won’t work or will accomplish something completely different in GIMP.
You may notice that the GIMP program prioritizes default features differently in various situations, such as scaling or copying a picture. For instance, you cannot simply paste a picture onto the current layer with the Ctrl+V keyboard shortcut. However, most image editors—whether or not they utilize Photoshop—tend to allow this.
However, as you use the app more, you’ll discover new things to learn and unlearn. These are the most noticeable distinctions that you will immediately notice.
Leave a Reply
You must be logged in to post a comment.