Overset Text in InDesign is text that does not fit within the boundaries of a given text box. This can happen if the text box is too small to contain the amount of text you are trying to fit, or if you adjust the font size without resizing the text box.
When you fill the text frame with enough text to cover it, InDesign places a small red box near the bottom right corner of the text frame’s bounding box, as shown below. It’s not the flashiest indicator I’ve ever seen in the UI, but it’s also a button used to link text frames (more on that later).

How to Fix Overset Text
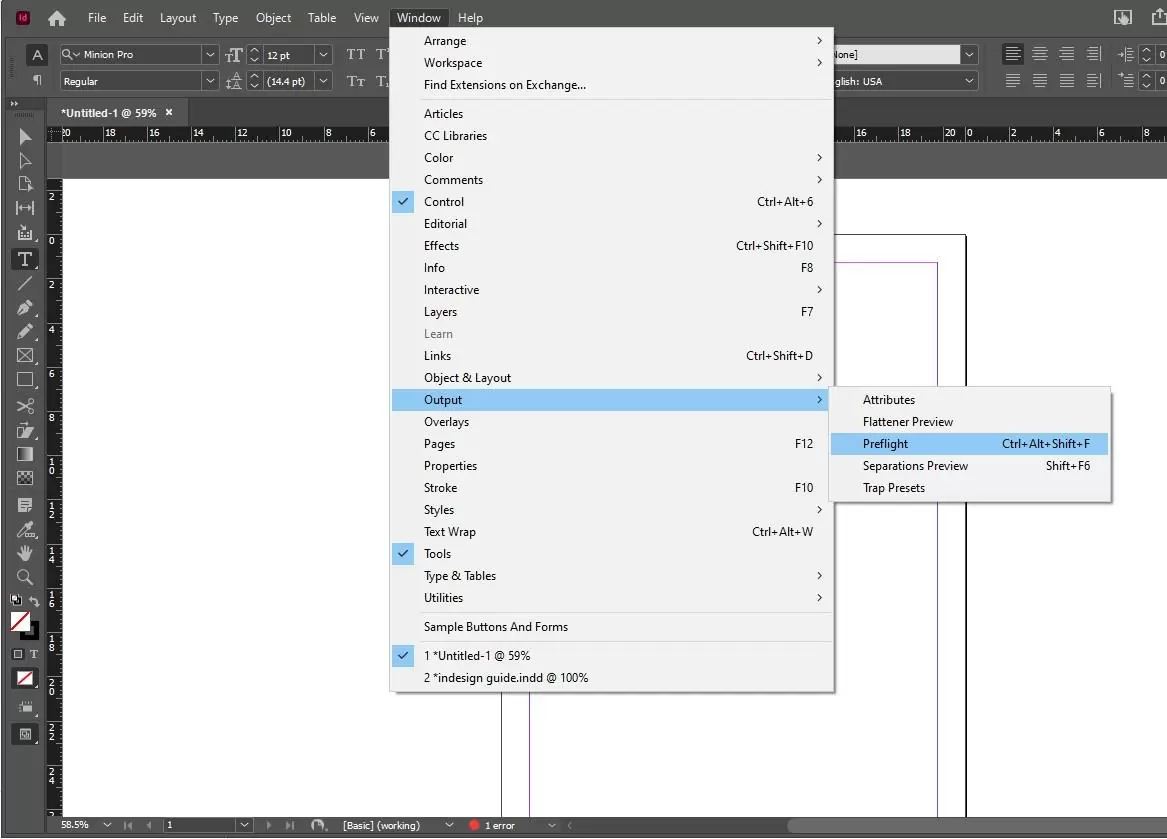
Open the Window menu, select the Output submenu, then select Preflight. You can also use the flexed finger keyboard shortcut: Command + Shift + Option + F (If you’re using InDesign on a PC, use Ctrl + Alt + Shift + F).

Click the entry labeled Text in the Error column to expand the section, then do the same for the entry labeled Overset Text. Each text frame containing overset text is listed with its corresponding page number. The page number also acts as a hyperlink to that page, allowing you to jump to the location of the error quickly. another way.
A more comprehensive way to fix overset text is to add a second text frame and join the two together. The linking process is very simple and just two clicks away. Switch to the Text tool using the toolbox or keyboard shortcut T and click and drag to define a new text frame. In a text frame with overset text, locate the text link icon within the bounding box, as shown below.
Click the small red + icon, and InDesign will “load” the overset text into your cursor. Unfortunately, I can’t take a screenshot of the cursor change, but you’ll know right away if it worked correctly. Then click on the second text frame to link, and the text will flow naturally between her two text areas.

The overset text indicator and the warning should disappear from the Preflight panel.
We also recommend you see our step-by-step instructions on adding page numbers in InDesign.
How To Find Overset Text in InDesign
It is very easy to learn how to find and fix any overset text in your document. I’ll show you how to do it.
When you take a look in the lower-left corner of your screen, you will see either a red circle or a green one. The red circle indicates that there is an issue while the green one, you guessed it right, indicates that there isn’t any issue.
You will see the Preflight panel when you double-click on the red or green circle. The Preflight panel will show you all your document’s errors, including the overset text.
Besides finding the overset text, Adobe InDesign will alert you to all the errors in your document before you export.
Since the issue might be new to you, read carefully through the next two sections to learn how to handle it.
You can also check see our guide on how to Slug in InDesign.
Tips To Avoid Overset
If you’ve read this far, I’m certain that you now know how to deal with overset text. I will show you some tips on how you can master the text in your InDesign and avoid overset. Learning these tips will give you complete control over each text frame.
Tip 1
The first tip is to make the text jump. You should often size your text boxes so that the text from the first box flows into the second one. This is one of the best ways to deal with a text. But what if I told you that there was a better method?
When you use “column breaks” you can control how your text will flow. Column breaks are important because they allow you to edit the text without having to trigger changes to the layout. Column breaks also allow you to replace your text with a shorter text and replace your text with a longer text. You can place a Column Break in InDesign by pressing Fn + Return on your keyboard or by clicking on Type > Insert Break Character > Column Break.
Tip 2
The second tip I’m going to give you is a bit advanced. It involves the use of paragraph style.
When creating a paragraph style, start with a style you use as the base, which is then linked to all your other styles. Now when you are about to finish your document, set the paragraph so it can have a Horizontal scale. The value of the Horizontal scale should be 130%. This would result in the text taking up space. Now, insert your Column breaks at the end of each text. Then, resize the frame to contain the correct text and set the Horizontal Scale back to 100%.
If you enjoyed reading this article, we recommend you check out our in-depth guide on How To Crop An Image In InDesign.
Leave a Reply
You must be logged in to post a comment.