You’ve just completed your Premiere Pro video project. It’s time to export the project. There is one way to export the video but you need to understand the settings of the Export window to achieve good quality while exporting your video.
How to Export Video from Premiere Pro
Here are 5 steps to Export Video from Premiere Pro:
Step 1:

Open the Export settings
First, you need to select your sequence from your video timeline. If there is one project only you don’t need to select the sequence.
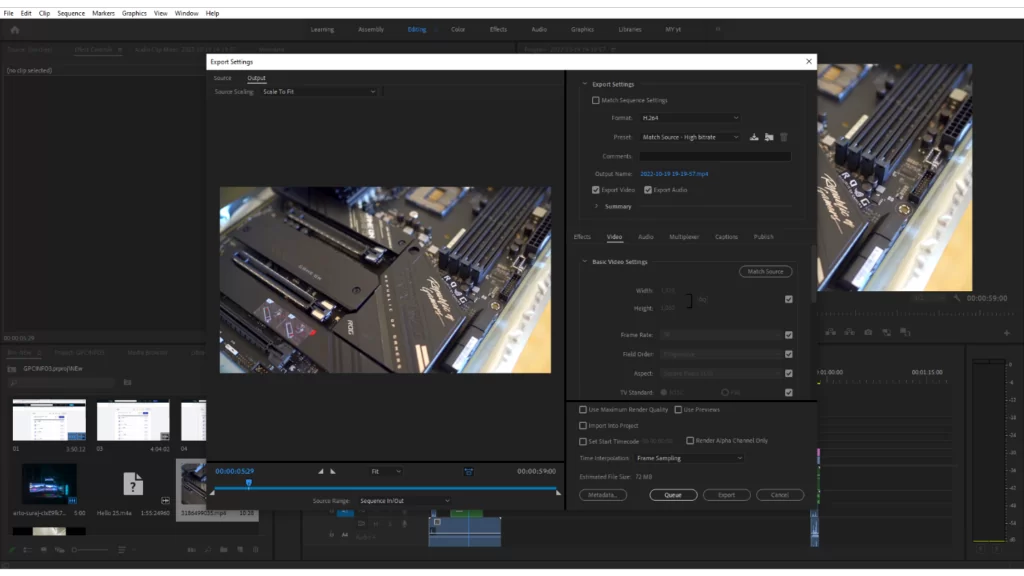
Then go to File > Export > Media. Or you can use the short key for windows [Ctrl + M] and Mac [Cmd + M]. This will bring up the Export Settings Window. In this Window, you find all of the settings that you will need to export your video perfectly.
Before Exporting the video make sure to close all unnecessary apps or software. This will help the video rendering process be buttery smooth. If the rendering process is lagging, then you can read our step-by-step guide on how to fix laggy video in Premiere Pro.
Step 2:
Choose Your Sequence Settings
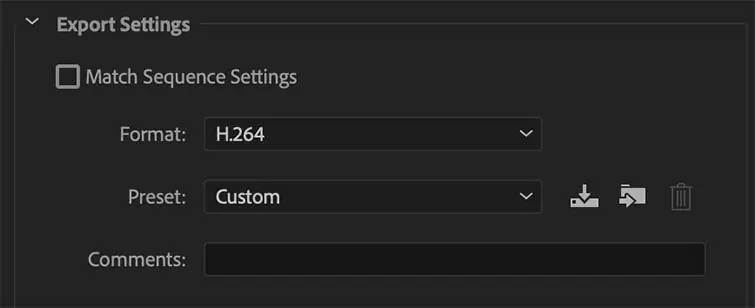
There are two settings you need to know first. One is Format and the second is Preset. For all the platforms on social media or any other normal productions use Format > H.264 and the preset > Custom. This is the best setting to export. But there are many other settings on Format and presets chose your respective one.
Step 3:
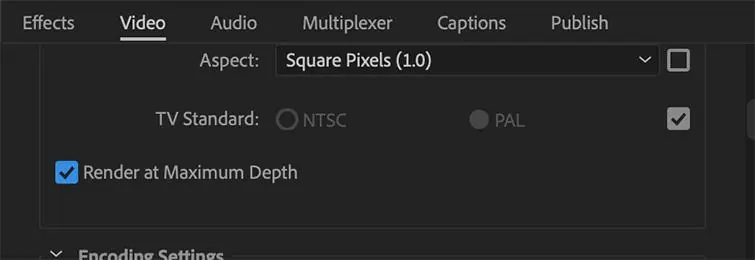
Chose your file destination and render at Maximum Depth. Next, chose your file destination from Output Name.

Make sure to click Render at Maximum Depth. This will increase your render time, but Premiere will take extra care in exporting your video in the cleanest way possible.
Step 4:
Finish your export in Premier Pro or Media Encoder. If you’re satisfied with all the settings at this point, you can just click Export.

But if you have lots of projects you can choose Queue and your project will be added to the media encoder for exporting. Next, click the green play button at the top to start the export. This is great if you want to add multiple Premiere Pro sequences to export at the same time.

I don’t recommend this. If you want to export easily just click on Export.
And yes, your video is ready to use.
Step 5:
Save Your Settings for Future Exports

If you want to use the same frequently use a custom setting, you can save it as a Preset. Click the Save Preset button on the right side of the preset drop-down in the export window. You can also name the preset whatever you like. Now, you can use that saved preset in the future.
What is The Best Export Format For Your Videos?
There is no definite export format that can be declared as the ultimate best. This is because what you want to do with the file will determine what format is appropriate for your video.
Despite a few exceptions, mp4 is frequently regarded as the greatest all-around video format because it works with virtually every device and internet platform.
For instance, mp4 files are compatible with all devices, including smartphones, PCs, DVD players, and social networking platforms like YouTube, Instagram, and WhatsApp. Even though mp4 files are quite versatile, they may also not be preferred by some certain editors.
Along with being cross-platform compatible, mp4 files compress the video data just enough to make it accessible without sacrificing quality. This guarantees that your spectacular video will be accessible to visitors regardless of how strong or quick their internet connection may be.
Things You Should Consider Before Exporting Your Video on Premiere Pro
Before you begin exporting your video, there are a few things you need to consider. First, you should determine where your video will be transmitted and how it will be viewed before you begin exporting the video.
It is easier to choose the right formats when you are certain of where your video will be uploaded because different platforms have varied criteria for formats. Most people just go ahead to choose mp4 but some platforms will transmit your video better if they are in some other format.
The next thing you need to consider when exporting your video is length. Ask yourself the following questions; How long is the video? Is it going to be posted on YouTube? Do you require a top-notch export for archival or stock video websites? Or will an email contain the video? Will you require a video that has been compressed? Or do you insist on the best possible version? You need to answer some of these questions before you start exporting.
Once you are sure of the precise objective of your film, you can then proceed to select the finest export choice from among the several formats. Thankfully, there are many presets offered by Adobe Premiere Pro. Some of the formats include H.264, AVI, TIFF sequence, and Quicktime MOV.
Save Your Export Settings!
This is a quick tip that is going to save you a lot of time and stress. You should think about saving the export settings if you want to use the same export settings for all of your videos.
When you save your export settings, you won’t have to spend the time or effort doing it all over again. The Save Preset option can be found in the export window’s preset dropdown menu.
After selecting your choice, you will be asked to give the preset a name. Simply select the name from the dropdown menu to access this saved preset at any time in the future.
Leave a Reply
You must be logged in to post a comment.