Exporting a video in Adobe Premiere Pro to an MP4 file is a quick and easy process that allows you to share your completed video with the world. As a professional video editor, I have exported many projects to MP4 files and have learned a few tips and tricks along the way.
First, it’s important to make sure that your Premiere Pro project is ready for export. This means that all necessary edits have been made and the video is finalized. Once your project is ready, it’s time to export.
By following the steps in this tutorial, you can easily export your Premiere Pro project to an MP4 file that is ready to be shared.
How to Export Premiere Pro To Mp4
Overall, all the platforms and devices are designed to work with mp4 videos, which is one of the most common video formats.
The format is so popular that Adobe makes it easy to export your video as an mp4. Once you finished your editing, here’s how to export the premier pro file to mp4.
Step 1:

Go to File > Export > Media and you can find the Export Settings.
For short key [Ctrl + M] for Windows and [Cmd + M] for Mac.
Step 2:
Type your file name in the output name and set the file destination where you want to save it.
Step 3:
For mp4, the video codec will be H.264 from the Format menu. This will create an mp4 file on export.
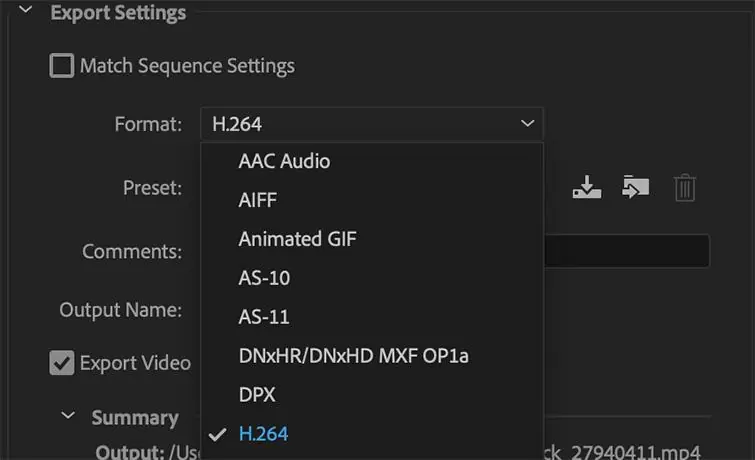
Note: There are many types of H.264 presets available by default in the Preset menu that provides a good balance between quality and playback performance for your video.
Step 4:
Click Export. Voila! Just as simple as ABC. But before you export your project, you can also do other things to make it better. For example, you can fix lagging problems or even split the clip.
How To Export Premiere Pro to MP4 1080p
Follow the steps below to export your Premiere Pro MP4 in 1080p format.
Step 1
Start by setting your frame size to 1920 by 1080. Then go to File>Export>Media
Step 2
Next, change the format to H.264 under the export settings heading in the dialog box. The Source Preset should be set to Match – High Bitrate. To modify your export location and file name, click the blue link in the Output Name field.
Step 3
For the third step, ensure that you choose Match Source under the video section to sync your sequence’s settings with your export settings.
Step 4
Finally, select Export, give it a few moments, then browse to your file location to view your file. Just that.
Exporting Multiple Sequences to MP4 and Troubleshooting
Exporting multiple sequences to MP4 is quite easy. First, you must install Adobe Media Encoder before choosing the Queue button. Choose the Queue button, not the Export option. When you’re ready to begin, click the Start/play button once you’ve finished queuing up all of your sequences for Media Encoder.
For the troubleshooting part, I’ll tell you what to do when your export is taking so long. Your Export may be slow because the effects you have in your project are too much.
It is also possible that your PC is slow or that it doesn’t fulfil Premiere Pro’s system requirements. However, if your project is still slow, go outside or grab a coffee to give yourself a break. Before you know it, it will be over.
How To Choose The Best Preset For Your MP4 Project
Choosing the right resolution for your project is as important as creating the right project. When you export your video in the H.264 format it will ensure good quality output. You should also consider where you will upload this video before choosing H.264.
This may enable you to select a more suitable Preset for exporting your video file. Each of the several Presets offered by Premiere Pro is specifically tailored for a different social media or video network that accepts videos. For instance, a variety of YouTube Presets, from 480p SD to 4K Ultra HD, is available for you to choose from.
Keep in mind that a high-quality preset won’t transform the clips if your initial film wasn’t captured at an adequate quality. This is very important to remember because you do not expect to shoot a video with a potato phone and expect good quality.
So, always consider the quality of the clips on your timeline as well as the final destination of your video before choosing a preset. In general, your video will be of higher quality the higher the bitrate.
You can export your project in several formats and upload it to the appropriate platforms if you plan to upload your video to many platforms. If you want your video to be of the finest quality regardless of where it is viewed, the above suggestion is one you should follow.
If you enjoyed reading this, you will also like our guide on adding transitions to your project!
Leave a Reply
You must be logged in to post a comment.