The pandemic has changed the way we work, leading to an increase in remote work. Many platforms have become more popular as a result and Slack hasn’t slacked in this regard. Slack offers freelancers, remote workers, and teams alike the platform to connect and collaborate.
If you are an entrepreneur or a team leader tasked to manage his business or team from a remote location, using Slack channels will help your cause. Read along to learn about creating Slack channels and some tips to make your Slack channels more efficient.
Creating a Slack Channel
Channels are special sections where specific groups or departments can discuss specific projects. The device you use would affect the way you create a Slack Channel. See the following ways below:
Creating a Slack Channel Using a Computer
You can create a Slack Channel on your computer with the following steps:
Step One: Log Into Your Slack Account
If you don’t have the Slack app, download it, click on ‘Get Started,’ and follow the prompts. You will be asked to supply your email address and some verification codes.
Step Two: Create a Channel
There are four types of Slack Channels:
- Public channels everyone in your Slack workspace can access.
- Private channels that only invited members can access
- Multi-space channels for members who have to work in more than one channel.
- Shared Channel is available in only the premium version of Slack, and you can use it to share information with different organizations.
Creating Public/Private Slack Channels
The difference between public and private slack channels is just a matter of setting. To create a public/private channel, do this:
1. Tap the home tab button, and a sidebar will appear. You will see the option CHANNELS, click on the + sign.
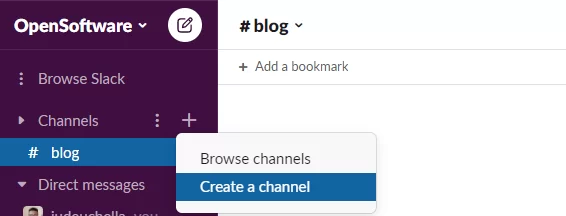
2. Enter the channel name and description. The description is optional.
You will find a PRIVATE Toggle button in the bottom-right corner. Turn it on if you want the channel to be private.
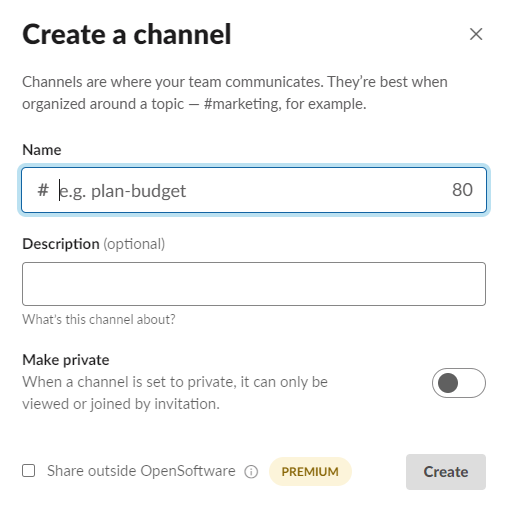
3. Tap CREATE to finish. Your channel has been successfully created.
Creating a Multi-Space Channel on Slack (Available on Paid Plan)
Slack’s multi-space channel allows you to share data with several interconnected channels. To create a multi-space channel, use the following steps:
- In the sidebar of your home environment, click on the channel’s name you want to share.
- Click on the information (i) icon at the top right corner and click on MORE.
- Click on additional options.
- Select add to other Workspaces.
- A menu would appear showing other channels in your slack space.
- Select the other channels or search for them using the search bar.
- Click on the green REVIEW CHANGES button.
- Slack will confirm that the selected workspace(s) can join the channel and see changes and history.
- Click on the green SAVE CHANGES button.
- It will create your new channel consisting of several workspaces.
NOTE: Creating multi-space channels is not an instant process. Expect Slack to take some time to make your channel available to the selected workspaces.
Creating Shared Channels on Slack
What if you are required to work with other organizations on a project? You can achieve this with shared channels on Slack, and the platform allows you to share information with up to ten organizations.
To share a channel with other organizations, follow the steps below:
- In the sidebar of your home environment, click on the channel’s name you want to share.
- Click on the information (i) icon at the top right-hand corner of the screen.
- Click on the More option on the far right and then ADDITIONAL OPTIONS.
- Click on SHARE WITH ANOTHER ORGANIZATION, and copy the link.
- Click on the green DONE button.
You can share the Slack-generated link to a contact in the other organization via email, WhatsApp, or any other messaging platform.
You can also use this method to share a channel with another workspace that you own.
If you have received a Slack-generated link from another organization. Do this:
- Copy the link and paste it on a web browser address bar and click ENTER on your keyboard.
- Select the workspace or organization you want to share the channel with.
- Slack will ask you to review the changes and accept the channel’s invitation.
- Click on the green ACCEPT INVITATION box.
Slack has now successfully shared your channel with another organization’s workspace. Remember that you need a Slack premium plan to share or accept invitations from other organizations.
Creating a Slack Channel on Your Mobile Device
Slack can also run on mobile IOS or Android devices. There are, however, slight differences in how you can create a channel.
Create a channel on your mobile phone with these simple steps:
1. Open the Slack app on your phone and log into your workspace if you aren’t already logged in.
2. Tap the workspace name at the top left corner to open the menu.
3. Tap the (+) sign next to ‘channels .’A menu would appear. If you are an iPhone user, tap CREATE at the top right corner of your screen and add Channel information.
4. If you are using an Android phone, click on the (+) icon in the lower right corner. Add channel information and tap CREATE.
Your channel will be set up in no time.
How to Get the Best from Your Slack Channels
Slack channels are helpful tools for business, but you should know how to use them. Here are some tips to help you get the best out of slack channels.
- Be specific with the names you give your channels. That way, messages do not get misplaced.
- Consider making some channels private to limit access to information.
- Don’t create additional channels for random processes that are not recurring, as it could confuse.
- Audit your channels from time to time. It will help you remove those channels that are no longer useful.
Conclusion
Creating Slack channels is easy but can quickly get confusing if you don’t know what to do. Follow the steps and tips outlined in this article, and you will have a smooth experience while creating and using the application.
Leave a Reply
You must be logged in to post a comment.