Occasionally, you might find yourself needing to change the page size in InDesign. The ability to change page sizes is an important aspect of design because it allows designers to create layouts that are tailored to specific dimensions and requirements.
For instance, a designer may need to change the page size to create a brochure that fits within a specific mailing envelope, or to adjust the layout for a poster that will be displayed on a specific-sized billboard.
Additionally, changing the page size can also be used to create different versions of a document for different media, such as a print version and a digital version of a brochure. It also allows designers to make adjustments to the layout to fit the content, so it doesn’t look cramped or crowded.
We’ll show you how to change page sizes and get started with creating layouts that are tailored to specific dimensions and requirements.
Changing InDesign Page Size
Create or open any document that you want to resize. After this, click file>document set up
Open this document setup panel you can change the size of the page
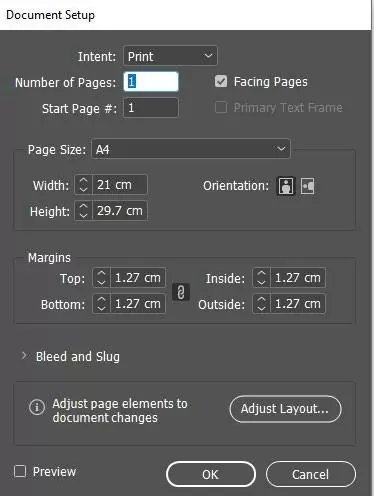
In this way, you resize the page according to your need
Other Methods For Changing Page Size In InDesign
In the next paragraphs, I will be showing you other ways in which you can alter the dimensions of your page in InDesign. The next method I’m about to show you will change the size of every page in your InDesign document.
Step 1
Start by opening the file menu and clicking the document setup. Alternatively, you can use the keyboard shortcut command+option P. If you are using a PC, use Ctrl + Alt + P.
Step 2
You can add new page dimensions in the Width and Height fields of the Document Setup dialog window. The window will be opened by InDesign when you complete the first step. Additionally, you can choose from several predefined page sizes or, if necessary, alter the page orientation. Next, press the OK button, and InDesign will resize each page in your document.
We aalso recommend that you check our guide on how to make a triangle using InDesign.
Method 2
The second method I’m about to show you will change the page size for a group of pages or an individual page. This gives you a lot of flexibility in shaping your document.
There are times when complex printing processes will require unique page structures. Dynamic screen-based projects also benefit from more freeform structures than typical business documents.
Step 1
You need to ensure that the page panel is visible in your workspace. To ensure that the pages panel is visible, open up the windows menu and click pages. You can also use shortcut Command + F12 to bring the panel into focus. The pages panel displays every page in your document. It also displays any parents page templates that are used in the document.
Step 2
Next, select the page that you want to adjust by clicking the appropriate thumbnail. Alternatively, you can select multiple pages by holding down the command/Ctrl key and clicking on additional thumbnails. The Shift key can also be held down to choose a range of consecutive pages.
Step 3
Next, select one of the predefined page sizes by clicking the Edit Page Size button (highlighted above) at the bottom of the Pages panel, or click the New option to input custom page dimensions.
You can also check out informative guide on underlining using InDesign.
Method 3
You can use this method if you need to alter the page size after you’ve already begun developing your layout. However, I have to warn you that it is a little more difficult.
For this method, you will need to use the Adjust Layout command instead of one of the ways mentioned above. Using the Adjust Layout command might take a lot of time and involve moving all of your layout pieces manually.
Step 1
Start by opening the file menu and click on Adjust Layout. You can also use a keyboard shortcut by pressing Option + Shift + P. If you are using a PC, use Alt + Shift + P if you’re on a PC.
Step 2
If you want to adjust the page size of all the pages in the document, then you need to enter the new page dimensions using the width and height fields.
If you are happy with the margin-to-page ratio in your original document, then you can check the box labeled Auto-adjust margin to page size changes. When you do this, your margins will become proportionally to your new page size.
Step 3
You can also adjust the font size of your text frames dynamically and choose if you want locked objects to be scaled along with the rest of your document.
When you are happy with your changes, click the OK button. When you click the Ok button, your pages will be resized and the page contents will be scaled proportionally to fit the new layout. Please keep in mind that this method can produce some unexpected results.
Did you enjoy reading this article? You will also enjoy our guide on How To Link Text Boxes In InDesign.
Leave a Reply
You must be logged in to post a comment.