In video editing, cuts are one of the most well-liked and effective tools for achieving the optimum flow. In order for the videos to flow seamlessly, pictures must be cut at the appropriate times. Video cutting is made easy using DaVinci Resolve. In reality, mastering DaVinci Resolve’s video-cutting features enables you to produce high-caliber videos.
This application is also regarded as one of the best video editing apps out there. But there are a number of issues with it. DaVinci Resolve, for one, needs at least 16GB of RAM. If your PC isn’t powerful enough, you might wish to try alternatives.
In this post, we’ll demonstrate how very easy it is to divide a clip in DaVinci Resolve so you can start making movies!
Also read: How to use Davinci resolve
Method 1: Using the Razor Tool
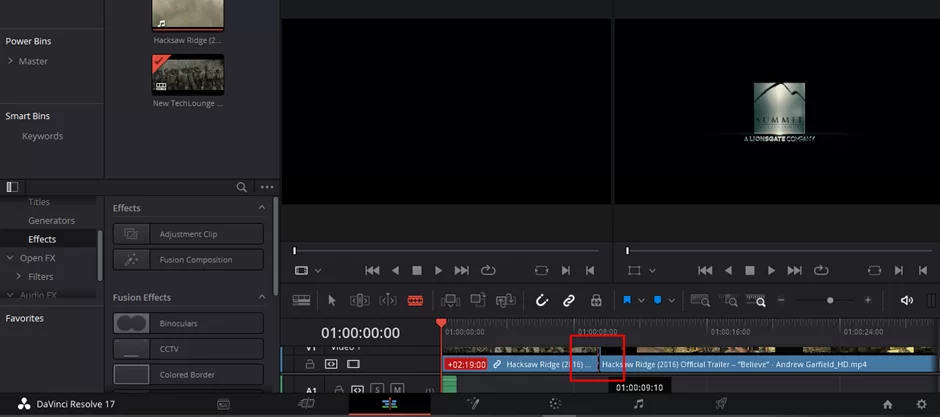
A set of icons that mimic tools is located above the DaVinci Resolve timeline. The selecting tool comes first. The trim/edit tool is the second. The dynamic trim tool is the third. The fourth symbol, dubbed the razor tool, resembles a razor blade.
In DaVinci Resolve, the tool used to separate clips is called the razor tool. Follow these simple steps to use the tool in cutting clips.
Step 1: Click on the “Edit” tab to be able to access the razor tool

Step 2: From the toolbar above the timeline, choose the razor tool.

Step 3: Left To divide a video clip, click on the section you wish to separate.

Congratulations! Your clip has been successfully divided. Now, if you click anywhere on the timeline, a split is added to the selected clip. Every time you click on the timeline, the razor tool will remain chosen and continue to separate clips until you choose the selection tool once again.

Make sure the magnet icon is chosen, then pick the cursor tool, drag the timeline cursor over the required area where you want to make a split, then switch back to the razor tool and make the split on the timeline cursor. This will give your split more accuracy.
See also: How to find saved projects in Davinci resolve
Method 2: The Keyboard Shortcut
This is another great technique for cutting a clip using DaVinci Resolve. It helps you achieve the task quickly and easily. Since the majority of the big industry video-editing programs employ this technique, it is worthwhile to spend extra time learning and using the keyboard shortcut. The more shortcuts you are familiar with, the more quickly you can edit videos.
Step 1: Move the timeline cursor over the clip segment you wish to separate.
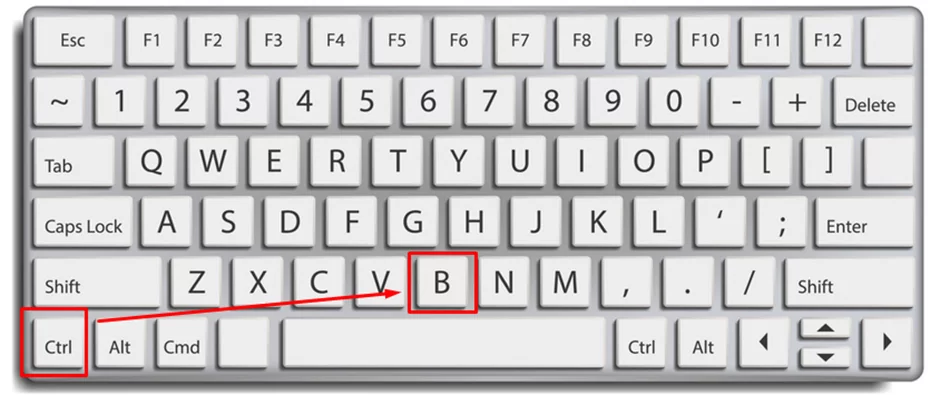
Step 2: Use the keyboard shortcut listed below to carry out the split after you are hovering over the location where it is desired:
- Ctrl + B (Windows)
- Command + B (macOS)

Common Use Cases for Cutting Videos In DaVinci Resolve
One of the most common use cases for cutting videos in DaVinci Resolve is to create engaging, high-quality content. With its powerful editing tools and integrated color correction capabilities, DaVinci Resolve allows users to easily cut out unwanted material, add graphics or effects, and adjust the timing of clips without compromising on quality.
Additionally, anybody can rapidly become proficient with this program because of its user-friendly design and the variety of plugins that are accessible for download on their website.
Furthermore, the ability to export projects as .mov files ensures that the end result looks professional regardless of what platform it’s viewed on. This makes DaVinci Resolve an ideal choice for video creators looking to produce content that will reach a wider audience.
Check out this information packed article on freezing frame in Davinci resolve
What Is The Fastest Way To Cut In Davinci Resolve?
The fastest way to cut in DaVinci Resolve is to use keyboard shortcuts. Keyboard shortcuts are one of the most efficient and effective ways to quickly navigate through the program, allowing you to easily move between menus, clips, and tools.
By familiarizing yourself with the different commands available in DaVinci Resolve, you can significantly reduce your editing time. For instance, using a combination of the JKL keys allows you to quickly move back or forth on any timeline by one frame at a time; this makes it much easier for making precise cuts.
Other helpful keys are “A” for selecting all clips in a timeline and “Ctrl+Shift+C” for copying a clip to another track and editing it. Understanding these crucial keyboard shortcuts can help you work more quickly when cutting in DaVinci Resolve with a little practice and persistence.
Final Thoughts
To prevent any unintended splits in your clips, be sure to switch back to the cursor tool after doing your split using the razor tool. All you have to do to undo a mistake, such as an unintended split, is hit the trusty Ctrl + Z (Windows) or Command + Z keys (macOS).
In just one straightforward course, you mastered one of the simplest and most important video editing methods. Now, you may drag your clips in any direction you choose to replace, move, fade, and so on.