
The ability to alter the opacity of brushes or other tools is a crucial issue for many digital artists. This may facilitate the achievement of specific effects or facilitate the rapid onset of strokes. You’ll need to understand how to adjust the opacity levels to get the most out of the Procreate app.
Depending on how you want to utilize Procreate, there are several ways to alter the opacity. This article will describe how opacity behaves in software and the many configuration and application options available.
What is Opacity in Procreate?
An opacity in Procreate is also known as blending, which is a means to make a layer transparent so that other layers beneath it can merge.
Opacity is frequently referred to as transparency, which is the same property. Procreate uses the word opacity, whereas other editing programs like Canva might use the word transparency.
Procreate’s opacity setting quantifies how much light may pass through a specific layer. Procreate layers with low opacity levels will let light pass through them.
SEE: How To Use Procreate
As a result, each layer in Procreate will become more or less translucent depending on whether you choose to increase or decrease its opacity.
How to Modify Tool Opacity
When procreate is launched, and a project is opened, several distinct toolbars with varying functions are displayed. The sidebar on the left side of the screen is the first place you should look if you want to alter the opacity in Procreate. Additionally, choose the tool you want to use because the Brush Tool, Finger Tool, and Eraser Tool each have different opacity levels that may be adjusted.
SEE: How To Add Fonts In Procreate
Here’s how to use the slider to modify the opacity.
- Use the bottommost slider on the left sidebar.
- To move the slider, click and hold. Drag it upward to raise the opacity level or down to lower it.

Use the tool you chose to check how its opacity has adjusted by using the canvas screen. By returning to the slider, you can adjust everything as needed.
Any brush in Procreate can have its opacity level adjusted individually. The opacity can be altered using a variety of parameters in the brush settings. Here, let’s concentrate on a few fundamental options.
- Select the “Brush” tool, then click on the chosen brush.
- Go to Properties under the brush settings.
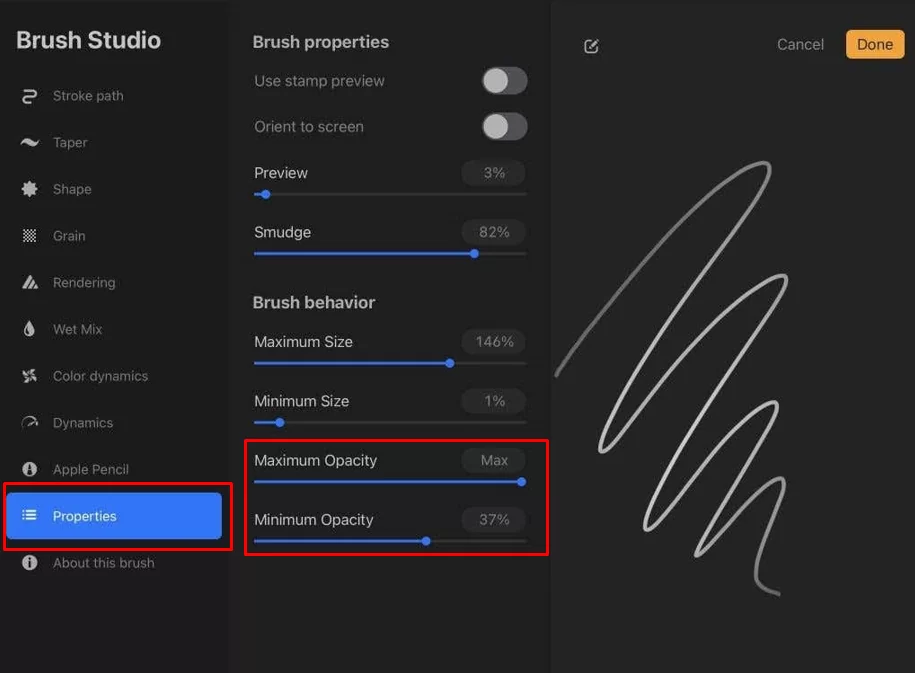
The “Maximum Opacity” and “Minimum Opacity” settings are at the bottom. The minimum opacity, or the lowest level of opacity the brush can achieve, depends on how firmly you press down on the pencil. This must first be changed.
The maximum opacity, or the maximum opacity of the brush, is now changeable. If you don’t want the pressure to be a factor, you can set the lowest and maximum opacity levels to the same value.
You can also use the Apple Pencil feature in the brush settings to further adjust the opacity:
Opacity Under Pressure is located under Apple Pencil.

Changing the opacity here will affect the opacity levels depending on how firmly you press the brush.
The center of the brush stroke in the preview has the most pressure applied, while the ends have less pressure.
How to Modify Layer Opacity
You might want to alter the opacity of a whole layer in several circumstances. This might let you overlay lines over the original sketch if you’re sketching or adding an effect quickly.
This is how:
- Tap the layer in the upper right corner.
- Tap on any layer’s blend mode, which is often N.
- There is an opacity slider above the blend mode.
- To increase the opacity, drag it to the left.
- To reduce it, drag it to the right.
Using Opacity: Some Useful Recommendations
The use of opacity in your designs is limitless, just like with other Procreate tools. Opacity may lend additional depth to your sketches, drawings, or written notes. Here are some recommendations for using this awesome feature.
Improve the realism
Opacity can help you get a more realistic outcome when adding special effects like smoke, fog, or shadows. To create these effects, experiment with low-opacity brushes, paint them on the same layer, and adjust their opacity to your preference.
Tracing over images or lines
Linework and tracing are two of the most practical applications of opacity. For instance, if you’re using Procreate to create an illustration, it’s simple to doodle a picture on one layer, then reduce its opacity so you can draw sharper lines on top of it on another layer.
Other Things You Can Do with Procreate’s Opacity
You can import the photo into Procreate as a layer and then decrease the opacity of that layer to make it easier to see your brush if you want to stroke a specific area or if you’re beginning to paint and want to practice on a reference image.
Compose Colors
Making effective use of opacity helps enhance drawing in Procreate. This enables you to express light and shadow by using brushes to darken colors.
Blend Colors
Color blending can also benefit from opacity. To get this effect, use a brush with a lower opacity than the color you wish to blend with and apply light strokes.
Can Procreate’s Opacity Be Set to a Certain Value?
In Procreate, whenever you move the opacity slider, there is a percentage value directly above the slider that indicates the precise opacity number at which your layer is now set. Unfortunately, tapping on the number to enter a precise value is impossible, which may upset some people.
However, you can modify the opacity more precisely by gradually sliding your finger down while swiping it across the canvas.
This allows you to slow down the slider to get an exact number so you may have more control over your painting. As you do this, you’ll notice that the slider moves a little slower. This is because you’ve modified the “scrubbing” speed.
Enjoyed this? There’s more! Feel free to read How To Resize an Image in Gimp.
Leave a Reply
You must be logged in to post a comment.