
Procreate is an app primarily used for drawing and painting on a mobile device. Recently, this app has gained popularity among artists and has even been featured in apps like the Apple App Store. If you’re thinking of buying this app or have recently bought it, you may not know how to use it to its full potential. This article will cover everything (or almost everything) you need to know about this app to get the best experience.
What is Procreate?
Procreate is a powerful sketching and painting app for iPad and iPhones that enables you to create professional artwork and is used by thousands of people worldwide. It has various tools designed to help you create realistic to abstract artwork quickly and easily. Procreate is a very intuitive app and is easy to learn. Some people use it for fun, others for business, and some to create amazing artwork.
How is Procreate used?
Procreate has been around for a few years, but it has recently gained a lot of popularity and is often compared to Photoshop. You can use Procreate to draw, paint, and sketch if you are an artist.
If you aren’t an artist, you can use it to design concepts and storyboards or even to doodle. Procreate is used by all types of people: professionals who use it to create the next big thing, amateurs who use it as a fun activity, and people who use it as a way to relax.
It includes several built-in brushes, pencils, and markers and allows for various file types to be imported. Some of the brushes and pencils are extremely realistic, and it’s possible to create detailed drawings with them. The files can be exported as PNG files, and then uploaded to a website, e-mailed, or printed.
As the application is relatively new, it’s not yet known just how popular it will become, but it’s easy to see why so many people are interested in it. For one thing, it’s possible to create various effects, and the brushes are very realistic. The only downside is that it can be difficult to learn. It’s certainly worth spending some time with it, though, as the results can be stunning.
Procreate Text Tool
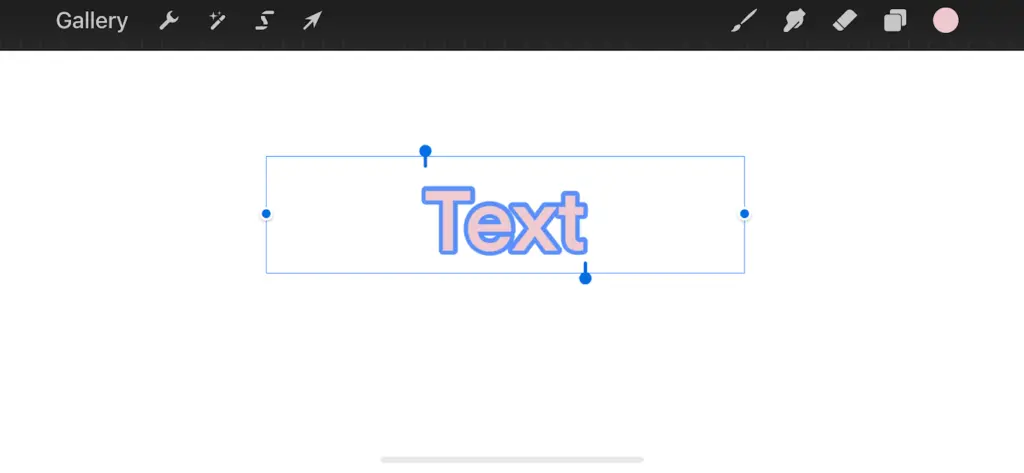
Using the Text tool, you can add text to your sketches and artworks. With the Text tool, you can type in any font, size, or color that you want. You can also change up the alignment too. And if you want a little more customization to your texts, Procreate allows you to get third-party fonts that are compatible with the app, install and use them. This way, the application creates some flexibility when it comes to personalizing designs to suit your needs.
You can easily share your awesome work with others when you’re done by uploading it directly from the app to Instagram, Twitter, or Facebook. Just go to the share tab, choose the format you want to export the design in, then choose the application you want to share.
Procreate Effects, Lighting & Filters
There are several effects that come with Procreate. These effects can be applied to what you are using to sketch your artwork. They include
- Sketch
- Pencil Sketch
- Watercolor
The Sketch effect makes everything look like it’s drawn on paper with a pencil or charcoal, and the Pencil Sketch effect works similarly, except it gives it more of a sketchy look with some chalk in there too. The Watercolor effect is self-explanatory; it gives your drawing an impressionistic watercolor look. You can play around with them on the brush section.
Next up is Lighting & Filters, which has seven different options that can all work together or separately depending on what you’re looking for. You have Tonal, Light, Midtones, Darker colors, Highlights, and Adjustments and Contrast. Tonal is great because it shows off colors nicely using dark backgrounds, while Light brightens colors by lighting them up a bit.
Midtones darken colors, while darker colors lighten colors by decreasing contrast so they don’t stand out as much. Highlights bring out certain areas of color by making whites white, blacks blacker, and all the colors somewhere in between lighter.
Adjustments include saturation and brightness to adjust how intense those individual colors appear on screen, while contrast changes how much contrast between light and dark shades. If you’ve never used these before and want something quick and easy, try adjusting the Saturation a little bit.
If you think the whole thing should be brighter, increase the brightness level to make it easier to see. As always, experiment until you find what looks best for your particular project!
Procreate Layers
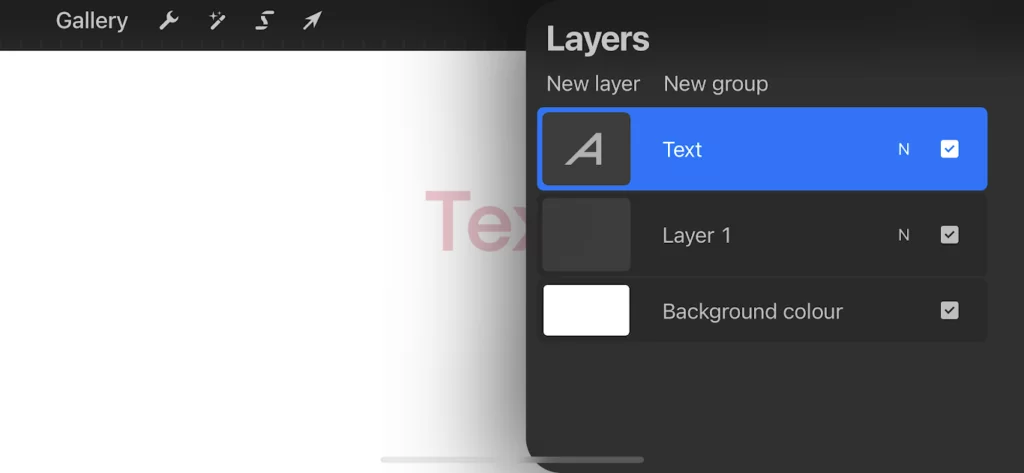
Layering features are the most prominent and important features in Procreate. They allow you to create much more realistic drawings because they are not vector based. With layering, you can create a drawing that looks like it has pen strokes as well as paint strokes on top of it.
This is also a feature that allows for creative blending and can be used for various purposes such as painting or drawing with both pen and paintbrush or pencil and crayon. Each layer contains its own opacity slider so you can adjust the appearance at any given time (which can be used in achieving tasks like tracing).
You’ll notice that your layers will show up in order from the bottom-most layer up to the top-most layer so make sure you pay attention when ordering them accordingly. You can do this by grouping them.
Procreate Canvas
This is one of the most crucial features of Procreate. Understanding how the canvas affects your work and what you are trying to create is important.
When working on a canvas, you have the option to zoom in and out by using either pinch or the magnifying glass tool. Pinching will allow you to zoom in, while zooming out can be done by using the magnifying glass tool. When zooming in, your whole canvas will fit within an inch of your screen; when zooming out, it will take up most of your screen.
You should always work zoomed-in because it will allow for more precision and accuracy with your movements on the iPad’s touch-sensitive surface. When drawing detail, work zoomed in to add detail without having to zoom out and then back in again constantly.
For example, if you’re painting a portrait, try drawing the eyes first before adding any other details so that you can focus on the subject. Zooming out gives your subject room to breathe and makes the painting seem larger than life. The only time it may be necessary to switch from a tight zoom to a wider view is when drawing across large surfaces like watercolors or outdoor scenes where details are very far away.
If you draw outdoors, the landscape becomes too wide for 1x but not wide enough for 3x. If you draw in watercolor, there are parts of the image that would be hard to see at all with 1x but can be seen easily at 3x. These features help guide your strokes and make sure they align properly with those around them so there is no overlap during editing.
Procreate Tips And Tricks
When using Procreate as a beginner, there are so many mistakes you are bound to make. For instance, you may decide to save all your work to a single layer, then close the layer. Later on, when you want to make modifications, you realize that you can’t because the app only allows you to undo or redo it before closing the work. Here are some helpful tips to avoid such mistakes that you should be acquainted with.
- Place your index finger and thumb to the topmost layer and the bottommost layer, respectively, to swiftly combine numerous layers. Any layers between those two will be merged as well.
- Create shadows quickly behind any artwork by duplicating the layer, putting the duplicate beneath the original, and then selecting Adjustments > Hue, Saturation, and Brightness > turning brightness all the way down. Then tap on adjustments > Gaussian blur and then drag your finger to the blur you want. The shadow may be made to appear fainter by adjusting the layer’s opacity.
- Click the wrench icon, then toggle the “dynamic brush scaling” option if your brush size varies as you zoom in or out.
- If you’re inking and want to be able to reuse a line width later, drag the brush size slider to the required percentage, hold the slider down, then press the plus symbol (+) in the slider window with a different finger while doing so. By doing this, you may rapidly switch to a different size after saving the brush size and vice versa (also applies to the opacity slider).
- To avoid quality loss while duplicating a layer numerous times, hide all other layers except the one you wish to duplicate, save the layer as a PNG file, and then import the PNG file as a picture or other image.
- In the “edit drawing guide menu,” each type of drawing guide has a unique aided drawing mode. Drawings on one side of the canvas will be mirrored on the opposite, 2D Grid makes it possible to create absolutely straight horizontal and vertical lines or any other shape you wish to create.
- Importing a photo will set the resolution of a new canvas to that of the imported image. Create a blank canvas in your preferred size, set the DPI to a high setting (300+), then while within the canvas, click the wrench icon, add, and then input a photo or file to prevent pixelization when working from an image.
Conclusion
As you can see, there are many possibilities for using Procreate to create art. If you’re looking for an application with easy-to-use and advanced features, try it out! You won’t regret it. If you want to know more about what Procreate offers for your creative needs, please refer back to our blog post about the topic. We will continue discussing the specific aspects of this app in future posts, so keep checking back if that’s something you find interesting.
More from Tech Lounge:
- How To Flip a Layer on Photoshop
- How To Resize an Image in GIMP
Leave a Reply
You must be logged in to post a comment.