The Blend Tool in Illustrator can be used to create smooth color transitions and gradients between two or more objects. With the Blend Tool in Illustrator, you can blend shapes, colors, and even text.
In this guide, you will also discover easy techniques to blend objects and create polished designs using the Blend Tool in Illustrator.
How to Use Blend Tool Illustrator
Blending is a skill that every good photo editor should have. You often need to blend one shape into another; if you need to learn how to use the blending tool, you stand to lose your clients.
With the blending tool, you can have great smooth and curved blends. You can blend by specific distances and blend different shapes and transparencies.
2 Steps to use the Blend Tool:
Step 1:
Go to the upper bar Object > Blend > Blend Options. And the Blend Options Panel will open. Here you need to do some settings before blending your object.

Select the Specified Steps and enter the value for this blend we will choose 20. Select the Orientation to Aling Path. And then Click Ok.


Now create your shape, line, or any object you want to blend. For this example, we will be using a straight line. First, create a straight line with the line segment tool.

Copy the line, hold Alt Click and drag far away from the first line.
Step 2:
Select both lines and go to Object > Blend > Make. Or you can use the short key [ Alt + Ctrl + B ].

Now your blend object is ready to use. You will see the anchor point of the lines, and multiple lines created.

Select the Direct Selection Tool or Press A From the keyboard to make a blend. Now select the anchor point and move it.

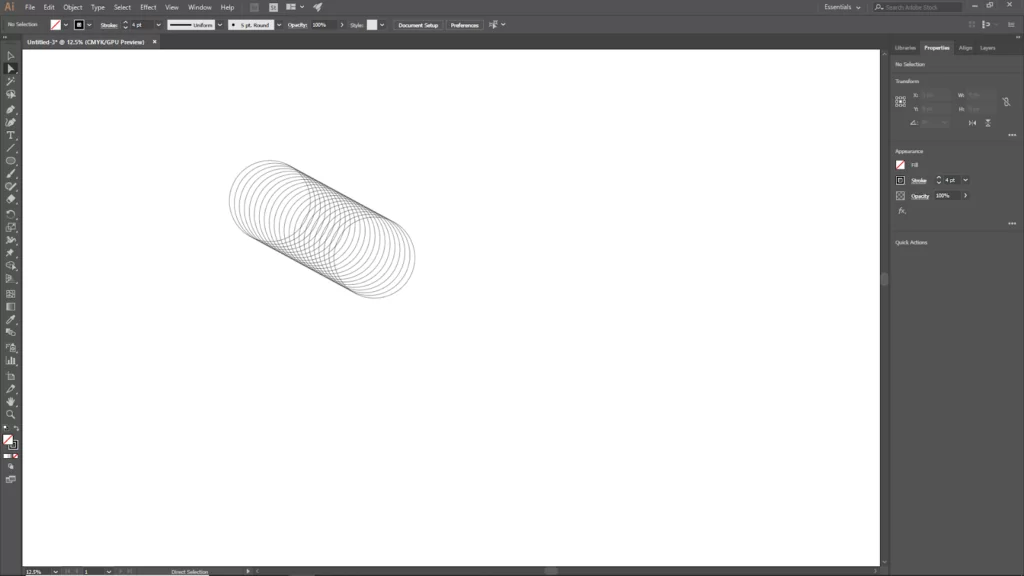
And you will see your object will blending along with your movement of the anchor point. You can move any of these anchor points. You can use other shapes to blend. Below the image, the Circle shape is blended using the same method.
How to Blend Shapes in Illustrator
The Blend tool’s most fundamental function is to blend one form into another over a predetermined number of steps. If you want to duplicate a circle, draw it once, hold Opt/Alt+Shift, then drag it across the artboard.
To blend the two shapes, select both shapes and choose Object>Blend>Make. Illustrator may create a default, but it may differ from your desire. Double-click the Blend toolbar icon to edit it while keeping the blend selected. Next, change the value for Specified Steps by selecting it. The illustrator software is also used to perform other tasks like drawing a circle which can then be blended using the blend tool.
You may immediately see the value’s impact on your mix if you use the Preview checkbox. You must understand that blending is a very flexible technique. This means that it works on forms that are both filled and stroked as well as those that use transparency
We also recommend that you read our article on How to remove background in Illustrator.
Using The Specified Distance Option to Blend in Illustrator
The second method of blending uses the Specified Distance option. The Specified Distance Option does exactly what it is meant to do: it separates the stages instead of designating a precise number by a distance that has been specifically set. Oops, that sounds like definitions we encountered in math class.
The Specified Distance option is helpful when creating exactly measured diagrams or bar charts, for instance, when parts must be evenly spaced apart and follow a preset grid.
Using The Smooth Color Option When Blending
Smooth Color is a slightly different option that produces a filled, smooth blend between your two objects. This smooth Color becomes quite useful when making very detailed gradients or cloth-like textures.
If you want to use the smooth color option, start by creating two shapes as you did previously, but this time give them two distinct colors and blend them as you did before. Then, select Smooth Color from the editing menu, and click OK. You’ll notice that to connect one shape to the next, a continuous block of Color has been created rather than blending in stages.
Replace Shine Option When Blending
When you start using the Replace Spine option to make blends on paths other than a typical straight line, the Blend tool becomes very useful. Start by drawing the shape or unobstructed path that you want the mix to follow, then select both the newly created blend and it. Select Object > Blend > Replace Spine.
You’ll notice that the mix has now clung to your new curve and created an intriguing look. Be careful when altering your blend; which alignment option you use, Align to Page vs. Align to Path, because both will have very different outcomes.
If you enjoyed reading this article, check out our in-depth article on how to add a drop shadow in Illustrator.
Leave a Reply
You must be logged in to post a comment.