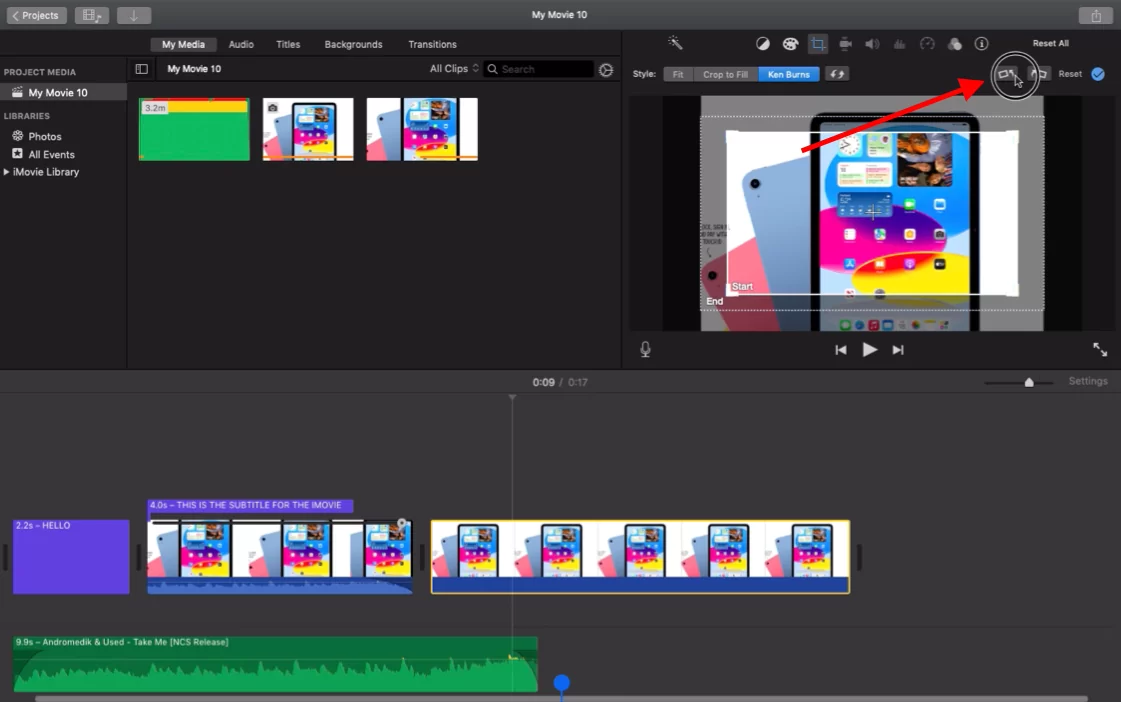
With the rise of vertical videos (videos shot in portrait orientation), many users are looking for ways to make their iMovie videos vertical. You can change your video orientation whether you’re using the app on a Mac or an iOS device.
We will cover some important tips and tricks to make sure that your vertical video looks great, and is ready to be shared on social media platforms like Instagram, TikTok, or Snapchat. This guide will walk you through the process of creating a vertical video in iMovie, so you can take your video editing skills to the next level.
How to Make iMovie Vertical
Step 1: Select the clip you want to vertically align using your mouse cursor.
Tip: Once a clip is selected, you will notice a yellow border around it.

Step 2: Select the crop option from the toolbar present on top of your video view area.

Step 3: Now select the rotate-clockwise or anti-clockwise button to rotate your video in increments of 90 degrees.

Now you can utilize your vertically rotating clip skills anytime.
Also, check out our detailed guide on how to edit using iMovie.

How To Make iMovie Vertical Using iPhone
You see, neither iMovie’s portrait mode nor its direct full-screen vertical video option is supported. However, you may edit a vertical video in iMovie and export it with black bars, and then use the built-in Photos app on your iPhone to get rid of the black bars and quickly convert the iMovie video back to vertical.
I know all these sounds tedious, but I will break them down in easy-to-understand steps. To discover how to make an iPhone vertical movie full screen, follow the straightforward instructions below:
Step 1
Start by tapping the plus sign to start a new movie in iMovie on your iPhone, then add the vertical videos you wish to edit.
Step 2
You may now notice that your portrait video recording is by default zoomed in one square. To change the video back to portrait mode, tap the Pinch to Zoom icon in the upper right corner and pinch the iPhone screen to zoom in or out. This will cause iMovie to display the entire clip and change the video back to its original ratio of being vertical.
Step 3
Once the video is vertical, you may edit it in iMovie as normal by including titles, backdrops, transitions, and other features! After you’re done, touch Done before selecting Share and then Saving Video.
Please note that although you’ve edited the vertical video in iMovie, it doesn’t save the project as a fully vertical video; instead, it adds black bars to either side of the vertical video. As a result, you must make the final adjustments to the iMovie video so that it will play on your iPhone in portrait mode.
We aalso recommend that you read our in-depth article on how to use aspect ratio in iMovie.
Step 4
Then, open the Photos app, choose the exported iMovie vertical video, and select Edit in the top right corner. Press the home button to return to the home screen.
Step 5
To save the iMovie vertical film as a true portrait one, navigate to the cropping area, drag the cropping tool to remove the black bars, and then hit Done.
Why is Vertical Videos Better?
Below are a few reasons why the popularity of vertical videos has skyrocketed.
- Phones are Held Vertically
The vast majority of smartphone users consistently hold their smartphones in portrait orientation. It’s more convenient and cozy. A 2017 survey found that even though landscape films look tiny on their screens, 72% of millennials never flip their phones horizontally when watching videos. That goes to show you why a lot of video editors are creating videos that can be watched vertically.
- Vertical Has a Genuine Feel
When viewed on a mobile device, which the majority of people use to quickly on-the-spot footage, horizontal video can appear overproduced. Think about scrolling through the amateurish vertical movies that your friends post when a cinematic horizontal advertisement appears out of nowhere. It is noticeable. On the other hand, the vertical video gives your content a more DIY style, which feels more sincere.
We also recommend that you check our in-depth article on how to do voiceover using iMovie.