Are you a Photoshop user who is struggling with printing designs? Does adding bleed in your artwork seem like an impossible task? Well, don’t worry! We’ve got the perfect solution for you.
In this blog, we’ll be taking a look at the basics of how to add bleed in Photoshop and how to make sure your design looks smooth and professional no matter what format it’s printed in. So buckle up, start your engines and get ready to ace the art of adding bleed in Photoshop!
In printing, bleed refers to the area of an image that extends beyond the edge of the finished product. For example, if you’re printing a business card with a full-color background, the background color should extend beyond the edge of the card to ensure that it extends all the way to the edge of the finished product. In Photoshop, you can add bleed to an image using the Canvas Size dialog box.
How to Add Bleed in Photoshop
Here’s how to do it:
Open your image in Photoshop and select the “Image” menu. Then, choose “Canvas Size.” This will open the Canvas Size dialog box.

In the Canvas Size dialog box, enter the desired dimensions for the finished product in the “Width” and “Height” fields. You can find the dimensions for the finished product on the printing company’s website or in the product specifications.
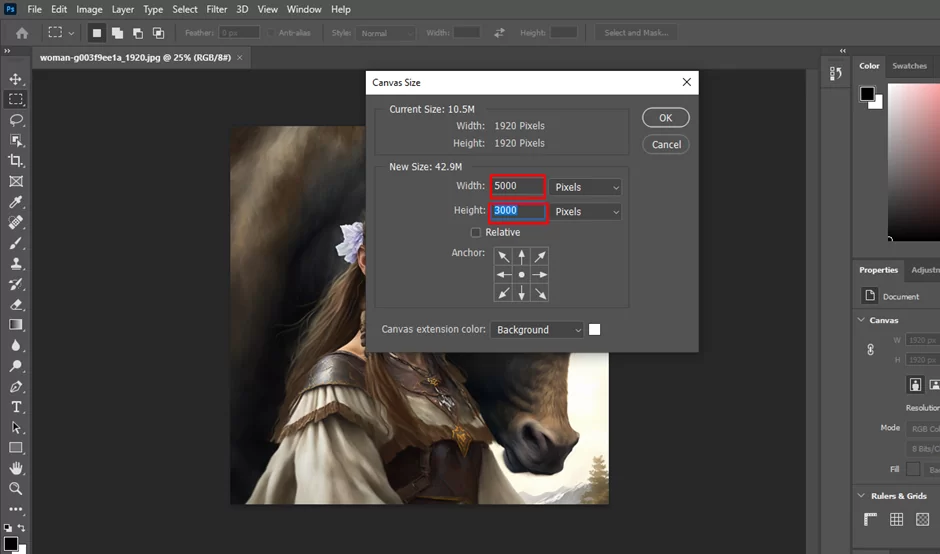
In the “Anchor” section of the dialog box, make sure the “Relative” option is selected. This will allow you to specify the amount of bleed you want to add in the “Width” and “Height” fields.

In the “Width” and “Height” fields, enter the amount of bleed you want to add in the units of measurement specified next to the fields (such as inches or pixels). Typically, the amount of bleed is specified by the printing company or in the product specifications. For example, if the finished product has a width of 3.5 inches and you want to add 0.125 inches of bleed, you would enter “3.625” in the “Width” field.

In the “Canvas Extension Color” section of the dialog box, choose the color that will be used to fill the added space on the canvas. This should be the same color as the background of your image.

Once you’ve adjusted the canvas size and chosen an extension color, click the “OK” button to apply the changes. Photoshop will automatically resize the canvas and fill the newly added space with the selected color.

To view the changes, use the Zoom tool to zoom in and out of your image. You can also use the Hand tool to move the image around, allowing you to see the entire canvas and any newly added space.

And that’s it! With these steps, you can add bleed in Photoshop.
How Do I Add Bleed Marks In Photoshop?
You can use the Rulers, Guides, and Grid settings to add bleed marks in Photoshop. These settings allow you to add horizontal and vertical guides to your image, which you can use to mark the edge of the bleed area. Here’s how to do it:
Open your image in Photoshop and make sure the rulers are visible. To show the rulers, go to the “View” menu and choose “Rulers.”
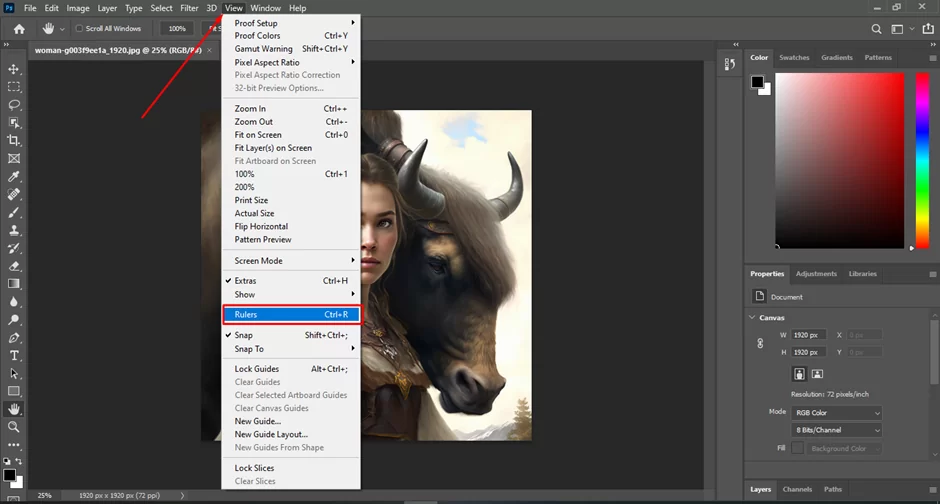
Alternatively, you can use the Ctrl+R (Windows) or Command+R (macOS) keyboard shortcut.

In the rulers, locate the edge of the bleed area. The edge of the bleed area is typically 0.125 inches (3 mm) from the edge of the finished product, but this can vary depending on the printing company or product specifications.
To add a horizontal guide, click on the horizontal ruler and drag the guide to the edge of the bleed area. To add a vertical guide, click on the vertical ruler and drag the guide to the edge of the bleed area.
To customize the appearance of the guides, go to the “View” menu and choose “New Guide.” In the New Guide dialog box, choose the orientation (horizontal or vertical), position, and color for the guide. Click “OK” to apply the changes.
And that’s it! With these steps, you can add bleed marks to your image in Photoshop using the Rulers, Guides, and Grid settings. Keep in mind that the guides are only visible while working on the image in Photoshop. They will not be visible in the final printed product. To include the guides in the final print, you’ll need to export the image as a PDF and select the “Include Bleed” option in the PDF Export dialog box.
Conclusion
Adding bleed in Photoshop can be a tricky task, but with the right steps and practice, you’ll be an expert in no time! It’s important to remember that adding bleed ensures your design prints correctly and looks professional.
By creating more canvas space around your design elements, you minimize any chances of cropping or margin errors. So grab your mouse, fire up the software, and get ready to create something great – happy printing!
Leave a Reply
You must be logged in to post a comment.