You may rapidly choose one of the numerous handy tools in Adobe Photoshop’s toolbar for selecting areas, cropping images, and other tasks by clicking on it.
All of our work in Photoshop is assisted by the tools on the toolbar. With one mistake, the Toolbar might occasionally vanish. Let’s look at How to get the Photoshop Toolbar back because the loss of one is inconvenient and the fix is simple.
How to Get the Toolbar Back in Photoshop
With the proper troubleshooting techniques, recovering the missing Photoshop tools or toolbar is simple. Use the effective techniques in this guide to learn how to replace your lost toolbar or certain tools.
1. Reboot Your Computer
Restarting your computer is the first thing you should do if you can’t find certain functions in Adobe Photoshop. This should reload Photoshop’s resources and make sure your device is free of errors and issues.
See the instructions below for Windows users to restart their computers:
- Pressing the Windows key on your keyboard will bring up the Start Menu.
- After that, go to the Power Options tab.
- Finally, select Restart.

The instructions below will help you restart your Mac:
- On your screen, click the Apple Menu in the upper left corner.
- Next, select Restart from the menu.
- Finally, to confirm your action, click the Restart option in the dialog box.

Once done, go back to Adobe Photoshop and try accessing the toolbar.
2. To Restore Panels, Use Keyboard Shortcuts
The keyboard shortcuts listed below are the standard ones for Photoshop panels. The tools without keyboard shortcuts are docked next to those that do.
- Action: ALT + F9
- Brushes: F5
- Color: F6
- Info: F8
- Layers: F7
Because they lack keyboard shortcuts, the Style and Swatches panels in Photoshop dock with the Color panel. The Tools panel cannot dock with other panels and lacks a shortcut.
However, by pressing the double-headed arrow placed above Tools, you can change it from a single-column strip to a two-column toolbox configuration.
This can function permanently as the toolbox arrangement in Photoshop Creative Suite 2.
3. Modify The Commands

- Select Keyboard Shortcuts under Edit in the Photoshop window. Or you can use ALT + SHIFT + CTRL + K.
- Go to the Application Menu Command section in the Keyboard Shortcuts and Menus dialog box.
- To open a shortcut field, expand the Window area and choose Tools.
You can assign Tools to shortcuts for interface components in this area. Press the buttons to trigger the tool of your choice. The pre-assigned shortcuts can also be changed.
4. Use The Windows Menu and SHIFT + TAB

- Utilize the Windows menu to make or hide the panels.
- Click with the right mouse button on the panel’s title bar.
- Click Close. The panels vanish after clicking close.
- Press the Tab to reveal them.
- Toggle all the panels on and off using the SHIFT + TAB key combination.
5. Modify The Toolbar

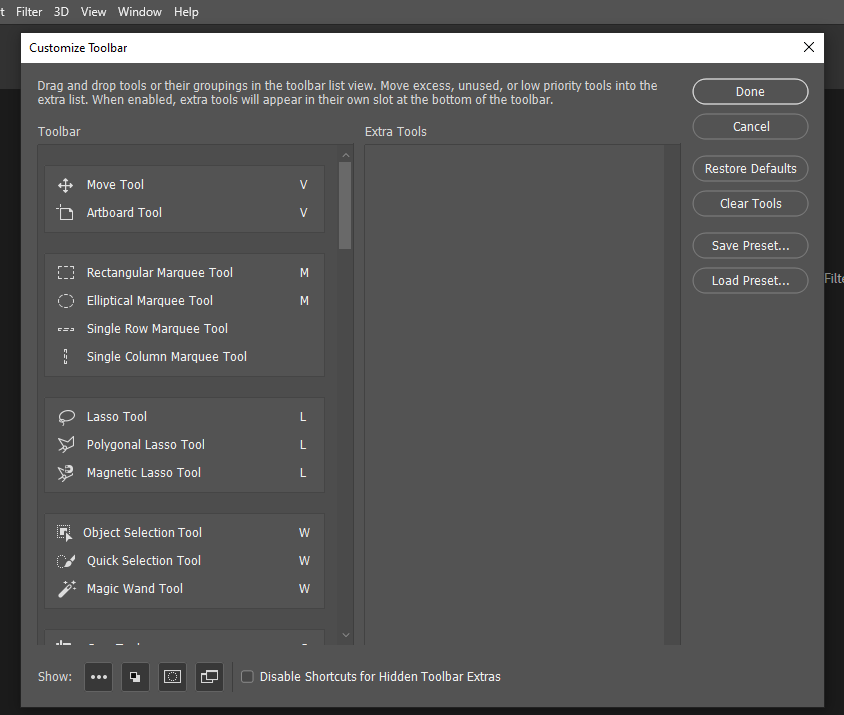
- Select Toolbar from the Edit menu, then click on Customize Toolbar. As illustrated in the screenshot below, you can also click the three dots icon on the left panel.
- Find the missing tool(s) in the Extra Tools list on the right.
- Drag the tool to the Toolbar list and then click Done when finished.
6. Create a Fresh Workspace

- To open the menu, select Window.
- After choosing Workspace, click New Workspace.
- Assign a name to the workspace
- Next, look at the toolbar, menus, and keyboard shortcuts.
- Save the workspace.
Only a specific set of tasks can have custom menu layouts and shortcuts added to a workspace.
Therefore, to resolve the problem of the toolbar not appearing in Photoshop, create unique workspaces that have customized configurations.
7. Make Use Of The Workspace Tools
- By selecting Window > Workspace, you can change to the new workspace.
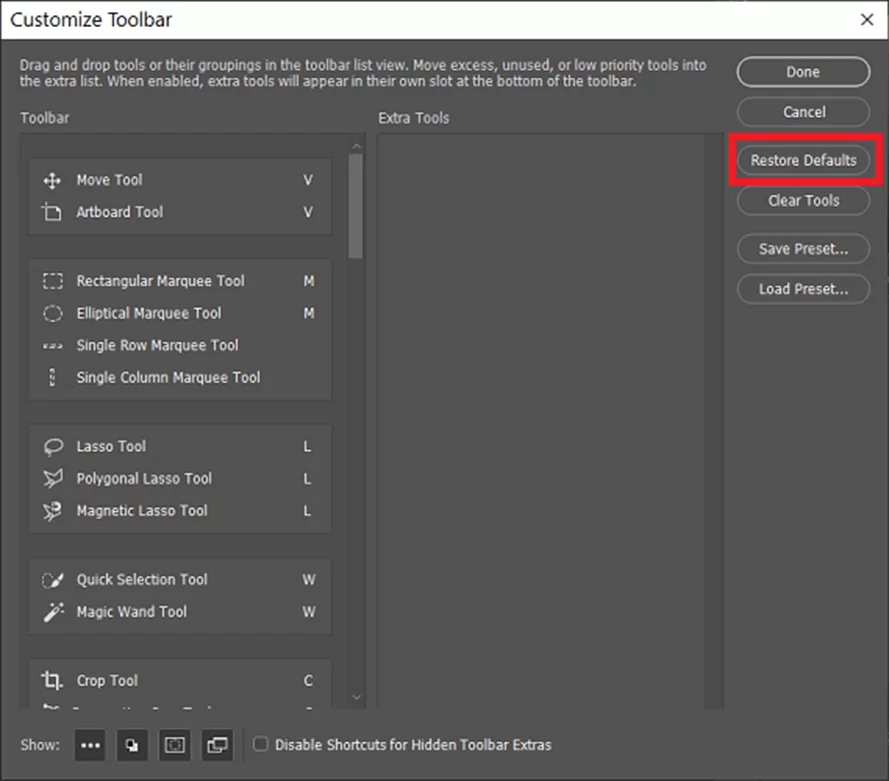
- Then choose your workspace and select Edit from the menu.
- Select Toolbar. By selecting the downward-pointing arrow on the Edit option at the bottom of the list, you might need to scroll even further down.
- Click Restore Defaults to finish.

When workspaces are set up but later undergo a change (such as an upgrade), some tools may disappear from the toolbar. In this situation, take the actions listed above to replace the missing tools.
8. Set The “Essentials” Workspace Back To Default

- After clicking Window, choose Workspace.
- Then click Essentials (Default).
- Next, select Reset Essentials from the list below.
9. Update Photoshop
You may not have a toolbar if you’re running a buggy edition of Adobe Photoshop. Use the instructions below to update Photoshop to the most recent version to rule this out.
- Open Adobe Photoshop on your computer.
- After that, select the Help tab.
- Then select Updates and follow the on-screen instructions.

Restart Photoshop after the update and check if the problem is solved.
10. Install Photoshop Again
The only thing left to do at this point is to reinstall Adobe Photoshop on your PC. Your configurations should be reset as a result, and you can be sure that your storage system is free of corrupt installation files.
Here’s how to remove Photoshop from Windows:
- Open the Control Panel first.
- Next, select Uninstall a Program.
- Lastly, select Uninstall by right-clicking Adobe Photoshop.

Drag Photoshop to the Trash Bin in the Finder > Applications on a Mac.
Once done, go to Adobe’s website and download the latest installer.
When Photoshop’s toolbar is hidden, the solutions in this article can go a long way in helping you solve the issue.
To summarize, the fixes entail restoring the tools, adjusting the keyboard shortcuts, creating a new workspace, modifying the toolbar, using the Essentials workspace, or completely reinstalling the application.
Leave a Reply
You must be logged in to post a comment.